


5. If ports are clogged, clean
with a straight
pin.
Do not enlarge or distort port. Do not
use a wooden toothpick. If adjustment is
needed, call
a qualified technician for
service.
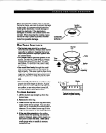
To replace burner cap, make sure
tabs
under cap are properly aligned and
leveled.
Place
cap on burner base with
tabs fitting in slots on either side of gas
tube opening (see illustration on page
11).
6. After cleaning
the gas tube opening and
7. Turn on
the burner to determine if it will
ports, replace
the trim ring and burner cap. light.
If the burner does not light after
(Trim ring must be replaced over burner
cleaning, contact
an authorized
base before replacing burner cap. Do not
Whirlpoole service technician. Do not
operate burners without trim rings in place.) service the sealed burner yourself.
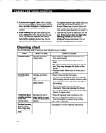
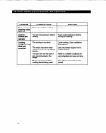
Cleaning chart
Use the following table to help you clean all parts of your cooktop.
PART
Control knobs
WHAT TO USE
Sponge and warm,
soapy water
HOW TO CLEAN
l Turn knobs to OFF and pull straight away
from control panel.
l Wash, rinse and dry thoroughly. Do not
soak.
l
Do not use steel wool or abrasive cleans-
ers. They may damage the finish of the
knobs.
l Replace knobs. Make sure all knobs point
to OFF.
Control panel
and trim
Sponge and warm, l Wash, rinse and dry thoroughly.
soapy water
OR
l Be sure to wring excess water from sponge
Paper towel and spray
before wiping around controls. Excess water
glass cleaner
in or around controls may cause damage to
the cc&top.
l
Do not use steel wool or abrasive
cleansers. They may damage the finish.
l Do not spray cleaner directly on panel. Apply
cleaner to paper towel.
Tempered glass
Sponge and warm,
l Wipe off regularly when cooktop is cool.
cooktop surface
soapy water or paper
(other than
towel and spray glass
l If soap or detergent solutions are used,
control panel)
cleaner
rinse thoroughly to prevent filmy residue.
l Dry with a soft cloth.
Surface burners,
grates, caps,
trim rings, and
contoured well
area
See pages
1 O-l 2
for cleaning instructions.
12