


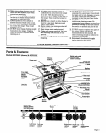


Using Your Range
Using the surface burners
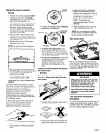
Control knobs must be pushed in, then
turned to the LITE position. The clicking
sound is the ignitor sparking.
After the burner lights, turn the control
knob back to a desired setting. The
control knob can be set anywhere
between HI and low setting, except at
LITE
Surface burner markers
The solid dot in the surface burner
marker shows which surface burner is
turned on by that knob.
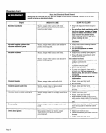
Until you get used to the settings, use
the following as a guide. For best
results, start cooking at the high
settings, then turn the control knob
down to continue cooking.
Use LITE to light the burner. After the
burner lights, turn control back to a
desired setting.
Use a high setting to start food cooking;
to bring liquids to a boil.
Use a medium setting to continue
cooking or to fry chicken or pancakes; for
gravy, pudding and icing; to cook large
amounts of vegetables.
Use a low setting to keep food warm
until ready to serve.
NOTE: Do not cook with the control in
the LITE position.
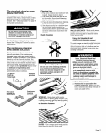
In case of a prolonged power
failure
Surface burners can be manually lighted.
Hold a lit match near a burner and
slowly turn the control knob on until the
burner lights. After the burner lights,
turn the control knob to the desired
setting.
Bum, Fire And Explosion Hazard
. Burner flame should not extend
beyond the edge of the cooking
utensil. The flame can bum you
and cause poor cooking results.
m Be sure all control knobs are
turned to OFF when you are not
cooking. Someone could be
burned or a fire could start if a
burner is accidentally left ON.
n If the flame should go out. while
cooking, or if there is a strong gas
odor, turn the burners OFF. Wait
five minutes for the gas odor to
disappear, before relighting
burner. If gas odor is still present,
see safety note on page 2. Failure
to follow these precautions could
result in explosion or fire.
. Do not attempt to light the oven
burner during a power failure.
Personal injury could result.
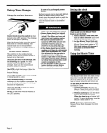
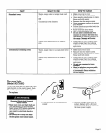
Setting the clock
Push in and turn the Minute Timer
Knob to set the Clock.
1, Push in Minute Timer Knob and
turn in either direction until clock
shows the correct time of day.
2. Let the Minute Timer Knob pop
out. Turn in either direction until
Minute Timer hand points to “12”.
The clock setting will change if
you push in the knob when
turning.
Using the Minute Timer
The Minute Timer does not start or stop
the oven. It works like a kitchen timer.
Set it in minutes up to an hour. You will
hear a buzzer when the set time is up.
Do not push in the knob when setting
the Minute Timer.
1, Without pushing it in, turn the
Minute Timer Knob until the timer
hand passes the setting you want.
2. Without pushing in, turn the knob
back to the setting you want.
When the time is up, a buzzer will
sound. To stop the buzzer, turn the
Minute Timer hand to “12”.
NOTE: Pushing in and turning the
Minute Timer Knob changes the clock
setting.
Page 4