


6
Water System Preparation
(on some models)
Please read before using the water system.
Immediately after installation, follow the steps below to make
sure that the water system is properly cleaned.
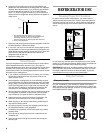
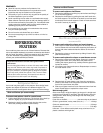
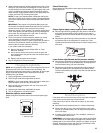
1. Open the freezer door and turn off the ice maker by lifting up
the wire shutoff arm as shown.
NOTES:
■ If your model has a base grille filter system, make sure the
base grille filter is properly installed and the cap is in the
horizontal position.
■
■■
■
Do not use with water that is microbiologically unsafe or
of unknown quality without adequate disinfection before
or after the system.
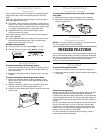
2. Use a sturdy container to depress the water dispenser bar
until the water begins to flow. Flush the water system by
dispensing and discarding 2 to 3 gal. (8 to 12 L) of water.
Cleaning the system will take approximately 6 to 7 minutes
and will help clear air from the line. Additional flushing may be
required in some households.
NOTE: As air is cleared from the system, water may spurt out
of the dispenser.
3. Open the freezer door and turn on the ice maker by lowering
the wire shutoff arm. Please refer to the “Ice Maker and
Storage Bin/Bucket” section for further instructions on the
operation of your ice maker.
■
Allow 24 hours to produce the first batch of ice.
■
Discard the first three batches of ice produced.
Custom Door Panels
Creating Custom Wood Panels
If you plan to install custom wood decorator panels, you will need
to create the panels yourself or consult your cabinet maker or
carpenter. See dimensional drawings for wood panel inserts.
Flat panels:
You can create a custom flat panel a maximum of ¹⁄₄ in. (6.35 mm)
thick to replace your decorator panels. Flat wood panels less
than ¹⁄₄ in. (6.35 mm) thick are not recommended.
Raised panels:
A raised panel design can be created by screwing or gluing wood
panels to ¹⁄₄ in. (6.35 mm) backing or by using ³⁄₄ in. (19.05 mm)
stock with routed edges. Raised panels should be spaced
2¹⁄₄ in. (5.70 cm) from the back edge of the handle to allow room
for fingers to grasp the handle.
Weight requirements for raised panel inserts:
■
Refrigerator door panel should not exceed 28 lbs.
(12.7 kg).
■
Freezer door panels should not exceed 21 lbs. (9.5 kg)
combined weight.
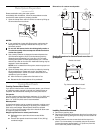
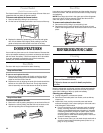
Dimensions for custom wood panels:
Routing Dimensions for Custom Panels more than
¹⁄₄
"
(6 mm) thick
Installing Custom Wood Panels
1. Remove any packing tape.
2. Remove the refrigerator and freezer door trims from the hinge
side of each door by pulling the trim away from the bottom of
the door first.
3. Partially unscrew the two screws that hold the top trim in
place. It is not necessary to completely remove the screws.
Loosen the screws approximately ¹⁄₄ in. (6.35 mm) from the
trim to allow the panels to slide freely.
15 3/8"
(39 cm)
19 3/32"
(48.5 cm)
15 3/8"
(39 cm)
67 15/16"
(172.5 cm)
23 3/4"
(60.3 cm)
29 13/16"
(75.7 cm)
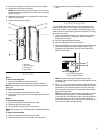
1/8"
(3.18 mm)
1/8"
(3.18 mm)
1/8"
(3.18 mm)
1/8"
(3.18 mm)
2¹⁄₂"
(63.5 mm)
min.
¹⁄₄" (6 mm) max.
handle
panel
1¹⁄₂" (38.1 mm)
min.
Handle side detail
¹⁄₄"
(6 mm) max.
¹⁄₂"
(12.7 mm)
min.
panel
Top, bottom and side trim detail