


4-14
3-Digit
Display
4-Digit
Display
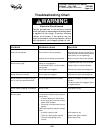
F1F1
F1F1
F1
E0E0
E0E0
E0
E1E1
E1E1
E1
E2E2
E2E2
E2
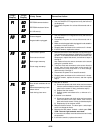
EEPROM communications.
UL A/D error(s).
EEPROM checksum failure.
1. Use the CANCEL/OFF keypad and verify the failure (if
not displayed).
2. Disconnect the power for at least 30-seconds and re-
check.
Shorted keypad.
Keypad cable unplugged.
1. Use the CANCEL/OFF keypad and verify the failure (if
not displayed).
2. Disconnect the power for at least 30-seconds and re-
check.
3. Make sure that keypad cable is plugged in and seated in
connector on back of control.
4. Reapply power and observe for a minimum of 1-minute.
5. If failure remains, replace the control.
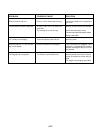
Corrective Action
Likely Cause
Oven sensor opened.
1. Measure the sensor value between the connector pins.
You should measure between 1000Ω @32˚F and 2697Ω
@ 900˚F. If the measurement does not correlate to real
temperature, replace the sensor, and reference steps 3
through 5.
Also measure from the sensor connector to the sensor
casing for a possible short.
2. Trace the wires and connectors to the sensor from the
control, then from the sensor back to the control.If all
connections are okay and there is no wire damage,
reference step 3 through 5.
3. Disconnect the power for at least 30-seconds.
4. Reapply power and observe for a minimum of 1-minute.
5. If failure remains, replace the control, and then repeat
step 4.
Clean range overtemp.
Bake range overtemp.
Oven sensor shorted.
F3F3
F3F3
F3
E0E0
E0E0
E0
E1E1
E1E1
E1
E2E2
E2E2
E2
E3E3
E3E3
E3
F2F2
F2F2
F2
E0E0
E0E0
E0
E1E1
E1E1
E1
1. If the door is latched:
a) Disconnect power and check wires and connectors
from the control to the door switch, then from the door
switch to the control. If okay, proceed to step b).
b) Replace the door switch.
c) Reapply power and observe for a minimum of 1-
minute.
2. If the door is not latched:
a) Disconnect power and check wires and connectors
from the control to the latch switch, then from the
latch switch to the control. If okay, proceed to step b).
b) Repeat step a) for the door switch.
3. Measure the door switch. The door open = switch open
small low voltage terminals.
4. Measure the latch switch. Unlatch = switch open. CAU-
TION: The oven light contacts are closed.
5. If corrections are made, reconnect the control and varify
the operation.
6. If the failure remains, replace the control.
F5F5
F5F5
F5
E0E0
E0E0
E0
E1E1
E1E1
E1
E1E1
E1E1
E1
Door & latch switches do not
agree.
Solenoid not operating or latch
switch failure.
Latch during clean error.