8
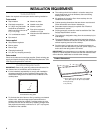
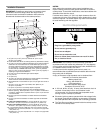
Installing Brackets Before Placing Cooktop in Cutout
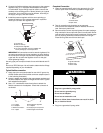
1. Using 2 or more people, place the cooktop upside down on a
covered surface.
2. Remove the attachment screws for the selected bracket
locations from the bottom of the cooktop base.
3. Select bracket mounting holes that will allow the bracket to
extend far enough out from the cooktop for the installation of
2½" (6.4 cm) clamping screws. See “Attach Cooktop to
Countertop” for illustration of clamping screw installation.
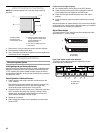
4. Attach brackets to cooktop base bottom with bracket
attachment screws using the bracket mounting holes
selected in Step 2.
5. Rotate brackets so they do not extend beyond edge of
cooktop base.
6. Tighten screws just enough to hold brackets in place when
cooktop is put in cutout.
7. Using 2 or more people, turn the cooktop right side up and
place in cutout.
NOTE: Make sure that the front edge of the cooktop is
parallel to the front edge of the countertop. If repositioning is
needed, lift entire cooktop up from cutout to avoid scratching
the countertop.
8. Loosen the screws and rotate the brackets so that they are
perpendicular to the edge of the cooktop base and extend
beyond its edge. Securely tighten screws.
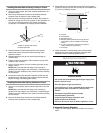
Installing Brackets After Placing Cooktop in Cutout
1. Using 2 or more people, place cooktop right side up into the
cutout.
NOTE: Make sure that the front edge of the cooktop is
parallel to the front edge of the countertop. If repositioning is
needed, lift entire cooktop up from cutout to avoid scratching
the countertop.
2. Remove the attachment screws for the selected bracket
locations from the bottom of the cooktop base.
3. Select bracket mounting holes that will allow the bracket to
extend far enough out from the cooktop for the installation of
2½" (6.4 cm) clamping screws.
4. Attach brackets to cooktop base bottom with bracket
attachment screws using the bracket mounting holes
selected in Step 3. Securely tighten screws.
Make Gas Connection
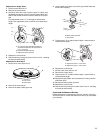
To Assemble Pressure Regulator:
1. Using 2 or more people, stand the cooktop on its side or
back.
A.Edge of cooktop base bottom
B.Clamping bracket
A
B
A.Cooktop
B.Cooktop base
C.Attachment screw
D.Clamping bracket (extends far enough beyond
cooktop base to allow installation of clamping
screws)
E.2½" (6.4 cm) clamping screw (to be installed in
“Attach Cooktop to Countertop”)
F. Countertop
A
B
C
D
E
F
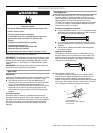
WARNING
Explosion Hazard
Use a new CSA International approved gas supply line.
Install a shut-off valve.
Securely tighten all gas connections.
If connected to LP, have a qualified person make sure
gas pressure does not exceed 14" (36 cm) water
column.
Examples of a qualified person include:
licensed heating personnel,
authorized gas company personnel, and
authorized service personnel.
Failure to do so can result in death, explosion, or fire.


