


12
To Broil:
1.
Open the broiler door and roll out the broiler pan and grid.
2.
Place the broiler pan and grid so grease can drain down into
the lower part of the broiler pan.
3.
Place food on broiler pan. Then place the pan on the broiler
rack and close the broiler door.
4.
Press CUSTOM BROIL.
The BROIL indicator light will light up.
5.
Press START/ENTER.
The ON and HEAT indicator lights will light up. The
temperature setting can be changed at any time during
broiling. If broiling while the Timer is counting down, the set
broiling temperature can be displayed for 5 seconds by
pressing CUSTOM BROIL.
6.
Press OFF/CANCEL when finished broiling.
To CUSTOM BROIL:
Changing the temperature while custom broiling allows more
precise control when cooking. The lower the temperature, the
slower the cooking. Thicker cuts and unevenly shaped pieces of
meat, fish and poultry may cook better at lower broiling
temperatures. If food is cooking too quickly, the broiling
temperature can be lowered by pressing the TEMP (▼) pad.
1.
Press CUSTOM BROIL.
2.
Press the TEMP (▲) or (▼) pads to set a temperature between
300°F (149°C) and 525°F (273°C).
3.
Press START/ENTER.
4.
Press OFF/CANCEL when finished custom broiling.
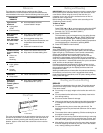
BROILING CHART
For best results, broiler pan should be rotated the same time the
food is turned. Times are guidelines only and may need to be
adjusted for individual foods and tastes.
Timed Cooking
(on some models)
The electronic MEALTIMER™ control (on some models) allows
the oven to be set to turn on at a certain time of day, cook for a
set length of time, and/or shut off automatically. Delay start
should not be used for food such as breads and cakes because
they may not bake properly.
To Set a Cook Time (on some models):
1.
Place the oven racks where needed and place food on the
appropriate rack. (See “Positioning Racks and Bakeware”
section.)
2.
Press BAKE.
The BAKE indicator light will light up.
3.
Set the temperature (optional).
Press the TEMP (▲) or (▼) pads to raise or lower the
temperature in 5°F (3°C) increments from the default setting
of 350°F (177°C).
4.
Press COOK TIME.
The COOK TIME indicator light will light up.
5.
Set the cook time.
Press the (
▲
) or (
▼
) pads until the correct cook time shows
on the display.
6.
Press START/ENTER.
Temperature or time settings can be changed at any time
after this step, by repeating steps 3 or 5.
The display will show the baking/roasting countdown time in
hours and minutes, or in minutes and seconds, depending on
the length of the cook time.
The MEALTIMER control setting may be cancelled, and the
oven turned off at any time by pressing OFF/CANCEL.
7.
When baking/roasting is complete, the oven will automatically
turn itself off, and 4 one-second tones will sound.
FOOD
COOK
TIME
minutes
SIDE 1 SIDE 2
Chicken, bone-in pieces,
boneless breasts
15-17
11-13
15-17
11-13
Fish Fillets ¹₂-³₄ in. (1.25-1.8 cm) thick 7-8 3-4
Frankfurters 5-6 2-3
*Ground meat patties ³₄ in. (1.8 cm)
thick, well done 11-13 6-7
Ham slice, precooked ¹₂ in. (1.25 cm)
thick 6-8 3-4
Lamb chops 1 in. (2.5 cm) thick 14-17 8-9
Pork chops 1 in. (2.5 cm) thick 19-21 9-10
Steak 1 in. (2.5 cm) thick, medium rare,
medium
well done
10-12
12-14
16-17
5-6
6-7
8-9
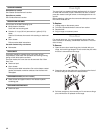
* Place up to 9 patties, equally spaced, on broiler grid.
WARNING
Food Poisoning Hazard
Do not let food sit in oven more than one hour
before or after cooking.
Doing so can result in food poisoning or
sickness.