


Page 12 SL 072710
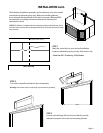
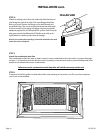
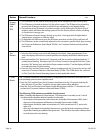
STEP 4:
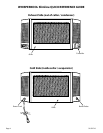
Slide the cooling unit in from the cellar side with the thermo-
stat facing the outside of cellar. The outer ange should be
ush to the wall. Secure the ange to the wall through the
pre drilled holes. The screws should penetrate the studs and/
or frame as well as the upper and lower supports to provide
adequate support for the WhisperKOOL system. Seal all cracks
and gaps around the WhisperKool Slimline unit with an air-
tight sealant or caulking to prevent air leakage.
Note: If you use decorative molding, it should be attached to the walls
and never to the cooling unit.
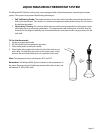
STEP 5
Attach the condensate drain line
The condensation drain line tube is used to remove excess condensation from the unit to a proper discharge
location. It is important that the drain line tube is properly connected and used to prevent leakage and other
problems associated with excess condensation.
Failure to use the condensation drain line tube will void the warranty on the unit.
STEP 6
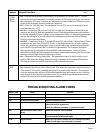
If removed, install the grille’s on both sides of the unit and plug in the power cord. The use of an extension
cord is not recommended.
INSTALLATION cont.
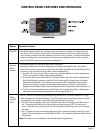
5
5
S
E
T
WhisperKOOL
CELLAR SIDE