


Page 12 XLT 020111
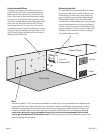
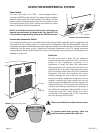
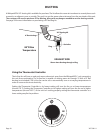
Placement of Unit
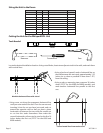
Slide the unit from the outside wall into your wine cellar with the outer flange flush to the outside wall.
Secure the flange to the wall through the predrilled holes. The screws should penetrate the studs as
well as the upper and lower supports to provide adequate support for the WhisperKOOL System (see
illustration). Seal all cracks and gaps around the WhisperKOOL unit with caulking to prevent air leakage.
(If you use molding, it should be attached to the walls, never to the WhisperKOOL unit itself.)
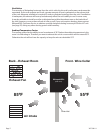
Electrical Outlet
The unit is equipped with two electrical outlets, one for installation inside the cellar and the other for
installation outside the cellar. Both outlets are initially covered and secured with screws. Select the out-
let to be used and remove that cover; the unused outlet must remain covered to avoid live electrical
charge. Remove side electrical outlet cover for easy through the wall installation. Immediately replace
cover when install is completed and prior to powering up unit if electrical cord is not attached to outlet.
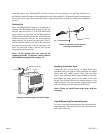
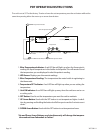
Installing Thermostat
Attach the thermostat to the front of the unit using the mounting bracket. Make sure the black male
plastic plug from the unit is securely fitted into the female plug located on the circuit board of the
thermostat. To complete the installation, insert the small black screws into each side of the thermostat
PDT/PDT Jr. securing it to the mounting bracket. Insert the probe into a wine bottle 3/4 full of water.
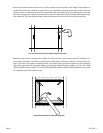
Slide unit, outside-in, into your cellar, and secure all screws rmly to the studs and supports.
Attach the PDT mounting bracket.
Attach the PDT to the mounting bracket.
Wall Stud
Two-by-Four Upper Support
Wall Stud
2” x 4”
Lower Support
Electrical Outlets
Drain line