


3
2
This appliance is for HOUSEHOLD USE ONLY. It may be plugged into any AC electrical outlet
(ordinary household current). Do not use any other type of outlet.
BEFORE INITIAL USE: Unpack blender and wash lid, measuring cap, container, gasket, cutting
blade assembly and collar in hot, soapy water before using. Lid/cap and cutting blade assemblies
must be disassembled before washing.
To remove measuring cap from lid: Twist cap until tabs on cap line up with notches on lid, and
disengage cap from lid.
To disassemble cutting blade assembly: Unscrew collar from base, and cautiously lift out cutting
blade assembly. Remove gasket.
IF BLENDER COMES WITH PLASTIC CONTAINER, TURN COLLAR CLOCKWISE TO DISASSEMBLE
FOR CLEANING.
IF BLENDER COMES WITH GLASS CONTAINER, TURN COLLAR COUNTERCLOCKWISE TO
DISASSEMBLE FOR CLEANING.
After washing parts, rinse and dry thoroughly. Wipe the blender base with a damp cloth or sponge
to remove any packaging dust. NEVER IMMERSE blender base, cord or plug in water or other
liquids. Use only gentle liquid detergents. Do not use harsh detergents or abrasive cleaners on any
parts of the blender.
ASSEMBLY INSTRUCTIONS
1. Place blender base on flat, level surface. DO NOT PLUG IN UNTIL BLENDER IS COMPLETELY
REASSEMBLED.
2. To reassemble blender: Replace gasket on cutting blade assembly and place assembly inside
of collar. Screw the collar securely on the container, and set assembled container in base.
Replace cap in lid and twist to secure. Place lid on top of container.
HOW TO USE THIS 14-SPEED BLENDER
1. Make sure OFF button is depressed.
2. Plug the cord into a standard AC outlet.
3. Place ingredients into container.
4. Make sure cap is on lid and lid is secure on top of the container.
5. Press button to select the desired function and speed setting.
6. Push the OFF button when processing is finished. Before removing the lid or the container from
the base, wait for cutting blade to stop rotating. To remove the container from the base, grasp
collar and container handle.
CAUTION: If container rotates during blending, immediately press the OFF button, then secure by
tightening cutting blade assembly on container.
HOW TO USE THIS BLENDER CONTROL PANEL
Push any one of the 7 buttons for up to 14 speed options and functions.
The Low/High/Pulse switch doubles the amount of speeds available.
To ensure precise blending, functions are labeled on each button.
LOW SPEED: Slide the Low/High/Pulse switch to Low. Select the desired function and depress the
corresponding button. Low-speed functions are labeled on the top line.
HIGH SPEED: Slide the Low/High/Pulse switch to High. Select the desired function and depress the
corresponding button. High-speed functions are labeled on the bottom line.
PULSE BLENDING: Place thumb on the Low/High/Pulse switch, move switch toward Pulse setting,
and quickly release it for short bursts of power. Pulse setting is ideal for small quantities or short
blending cycles. For example, use the pulse setting to crumb a variety of dry ingredients: cookies,
crackers, breads. Also ideal for chopping vegetables and nuts, grating cheese or chocolate.
This blender is not capable of the following functions:
Grinding meat, mashing boiled potatoes, kneading dough, whipping egg whites stiff, extracting
juice from vegetables and fruits.
HOW TO USE
OPERATING INSTRUCTIONS
PRODUCT MAY VARY SLIGHTLY FROM ILLUSTRATIONS
LINE CORD SAFETY TIPS
1. Never pull or yank on the cord or the appliance.
2. To insert plug, grasp it firmly and guide it into outlet.
3. To disconnect appliance, grasp plug and remove it from outlet.
4. Before each use, inspect the line cord for cuts and/or abrasion marks. If any are found, this
indicates that the appliance should be serviced and the line cord replaced. Please return it to
our Service Department or to an authorized service representative.
5. Never wrap the cord tightly around the appliance, as this could place undue stress on the
cord where it enters the appliance and cause it to fray and break.
DO NOT OPERATE APPLIANCE IF THE LINE CORD SHOWS ANY DAMAGE, OR IF APPLIANCE
WORKS INTERMITTENTLY OR STOPS WORKING ENTIRELY.
If the supply cord is damaged, it must be replaced by the manufacturer or its service agent or
similarly qualified person in order to avoid a hazard.
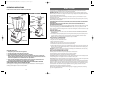
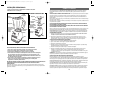
Measuring
Cap
Lid
Container
Cutting Blade
Assembly
Collar
Base
Low/High/Pulse
Switch
Control Panel
PRODUCT DIAGRAM
Gasket
Control
Panel
Low/High/Pulse
Switch
Base
Collar
Cutting Blade
Assembly
Container
ASSEMBLY DIAGRAM
2000/3-24-53E/S/PLAT.GEN.BLND.U 8/29/00 3:52 PM Page 4