


4
3
This appliance is for HOUSEHOLD USE ONLY. It may be plugged into any 230-volt AC
electrical outlet (ordinary household current). Do not use any other type of outlet.
INITIAL USE
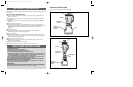
When unpacking blender make sure to use caution when handling the cutting blade
assembly, as it is sharp. Before using blender for the first time: Wash lid, cap, container,
rubber gasket and cutting blade assembly in hot, soapy water. Wipe the blender base
and inner well with a damp cloth or sponge to remove any packaging dust.
NEVER IMMERSE blender base, cord or plug, in water or other liquids. Use only gentle
liquid detergents. Do not use harsh detergents or abrasive cleaners on any parts of the
blender.
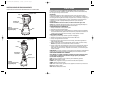
ASSEMBLY INSTRUCTIONS
1. Place blender on flat, level surface.
2. Make sure blender is unplugged.
3. Place rubber gasket inside cutting blade assembly. Securely screw cutting blade
assembly to container by twisting it counterclockwise and place assembled unit on
base. Secure cap in lid and place lid on container.
HOW TO USE BLENDER
1. Be sure switch is Off.
2. Plug blender into any 230-volt AC outlet.
3. Place ingredients into container.
4. Make sure cap is in lid and lid is secure on top of the container.
5. Turn switch to desired speed setting: Low (1), High (2) or Pulse (P).
NOTE: The Maximum continuous operating time: 3 minutes.
6. Turn switch to Off when processing is finished. Before removing the lid or the
container from the base, wait for cutting blade to stop. To remove the container from
the base, grasp base with one hand, and use the other hand to lift container
from base.
CAUTION: If container rotates during blending, immediately turn Off, then secure by
tightening cutting blade assembly on container.
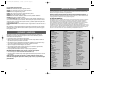
USING BLENDER CONTROL
NOTE: Due to the varieties in amount and consistency of some foods when processed,
the following should serve only as guidelines for processing.
Use Low speed (1) to:
STIR: Frozen juices, whole eggs, instant puddings, gelatins
BEAT: Thin batters and sauces
PUREE: Cooked fruits and vegetables for baby foods, special diet foods
CREAM: Smooth spreads and dips
CHOP: Fresh fruits, vegetables, nuts, pickles, hard-boiled eggs
MIX: Batters, fillings, sauces, dips and gravies
WHIP: Mixed drinks, whipped cream
Use High speed (2) to:
MINCE: Onions, garlic, vegetables, nuts
GRATE: Coconut, citrus peel, whole spices
SHRED: Coarsely chopped vegetables
BLEND: Nut batters, hollandaise sauce and salad dressing
GRIND: Coffee, split peas, bread and nuts
FRAPPÉ: Malts, milk shakes, fitness drinks and smoothies
LIQUEFY: Fruits and vegetables in liquid, desserts
Use Pulse blending (P) for small quantities or short blending cycles and for crushing ice.
For pulse blending, move switch toward Pulse setting and quickly release it for short
bursts of power.
CRUSHING ICE: Add liquid first. Then add ice cubes one at a time.
This blender is not capable of the following functions: Grinding meat, mashing boiled
potatoes, kneading dough, whipping egg whites stiff, extracting juice from vegetables
and fruits.
HOW TO USE
CARE AND CLEANING
This appliance requires little maintenance. It contains no user serviceable parts. Do not
try to repair it yourself. Refer it to qualified personnel if servicing is needed.
• Always unplug the unit before cleaning.
• Remove lid from container and separate cap from lid by twisting cap
counterclockwise and pulling upward.
• To clean the container, disassemble the blender by lifting container from
base and cautiously unscrewing cutting blade assembly and removing it
from container.
• Separate rubber gasket from cutting blade assembly.
• Wash lid, cap, container, gasket, and blade assembly in hot, soapy water. Rinse and
dry thoroughly.
• Wipe outside surface and inner well of base with a damp cloth or sponge.
REMINDER: NEVER IMMERSE base in water or any other liquids.
• Reassemble (see ASSEMBLY INSTRUCTIONS).
• When storing blender, leave lid slightly open to prevent container odor.
NOTE: The container, including the cutting blade assembly, lid and cap, must be
washed only by hand. Do not put these parts in an automatic dishwasher, as damage
may occur due to heat and water pressure.
99/11-8-27E/S.LAT.GEN.BLN.UC 5/2/00 5:27 PM Page 4