


6
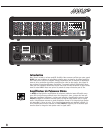
General Operating Instructions
1. Connect the AC power cord to a 120 Volt AC grounded power outlet (230 to 245 Volts in export units).
2. Turn the CHANNEL level controls, EFX level controls, Record, and Tape/CD level controls, and MAIN
master level control to 0 initially.
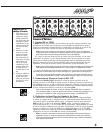
3. Now connect low-impedance microphones to the 3-pin XLR type MIC inputs.
4. Connect high-impedance microphones or mono line-level signal sources (mixer line outputs, keyboards
etc.), to the ¼-inch balanced LINE IN phone jacks on channels 1-5. Connecting more than one sig-
nal source to both XLR and ¼-inch phone inputs is not recommended; this includes stereo sources (if
you try to connect a stereo source to a mono channel using a Y-adapter, you may get distortion). The
¼-inch phone input on channels 5 is optimized for musical instruments and is not balanced.
5. Connect a stereo source (CD player, tape deck, stereo keyboard, MP3 player etc.) to the Tape/CD In
jacks. Use shielded patch cords for all pre-amp connections.
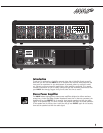
6. We recommend using 18-gauge speaker cables, using shielded patch cords to connect speakers will waste
power by heating up. Connect one or two 8-ohm PA speakers or one 4-ohm speaker to each SPEAKER out-
put on the rear panel.
Note: Two 8 ohm speakers can connect to each amplifier output. Connect the first speaker to the
MM5D speaker output. Run a speaker wire from the first speaker to the second speaker. Using this
method four 8 ohm speakers can connect to a MM5D (two per channel). Two of the 8 ohm speakers
can face the audience and two 8 ohm speakers can be used as floor monitors for the performer.
7. Position your main PA speakers at the front of the stage, pointing directly at the audience. If you
have them position your monitor speakers on the stage floor, preferably to one side of the micro-
phone stands, pointing up at the performer. Try to use cardioid or uni-directional microphones to
help reduce the threat of feedback through the monitors (avoid having the back of the microphone
pointing directly at the speakers).
8. During a sound check and with the band playing or performer speaking make the following
control adjustments:
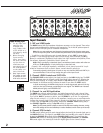
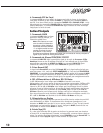
i. Set the MAIN level control to 7 to start. Set the GRAPHIC EQUALIZER to 0. Set the CHANNEL
BASS and TREBLE controls to the 12 o’clock position. Turn all EFX level controls to 0.
ii. On mono channels, you need to set the CHANNEL LEVEL appropriately. When using microphones
for vocals the pointer of the CHANNEL LEVEL control knob should be set between 6 and 9 on the
graphic around the CHANNEL LEVEL control knob. At this point you can turn the MAIN level con-
trol up or down to adjust the overall sound level coming from the loudspeakers. For inputs plugged
into the channel phone jack you should set the CHANNEL LEVEL between 1 and 9 on the graphic
around the CHANNEL LEVEL control knob. Channel 5’s phone input is tailored for guitars with pick-
ups that plug into the mixer. It is best to set the gain on the guitar to the mid position for best
headroom and lowest noise level.
iii. Now you can adjust he CHANNEL BASS and TREBLE controls for a better sound for each channel.
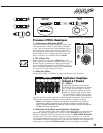
iv. Turn up the EFX controls on those channels requiring the selected Digital Effect. Typically, the lead and
harmony vocal channels would be good candidates for effects. Reverb can be used on other channels for
other instruments, but should be used sparingly.
9. Feedback during a performance is usually caused by one of the stage monitors positioned too close to a
microphone or sound from the main speaker reflecting through the room back into the microphones. If
feedback occurs, try the following procedures:
i. Direct the floor monitor speakers away from the microphones.
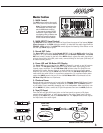
ii. Use the GRAPHIC EQUALIZER to reduce feedback. Without the music playing turn the MAIN level
control up to the point of feedback and watch for one of the LEDs located on the end of the
GRAPHIC EQUALIZER sliders to turn on. When the specific slider LED turns on, slide the slider
down to about -3 to -5 dB. Usually only 2 or 3 bands can be reduced before the feedback reduc-
tion process begins to affect the sound quality. If this occurs move the microphones away from the
monitor and main loudspeakers, and turn down the channel gain level of any microphones that are
not used by performers. Using the graphic equalizer with small adjustment to reduce feedback will also
improve the sound that your audience will hear as reducing feedback adjusts for room resonances which
make your sound “boomy or pingy” to the listener