


14
Wall Cabinet Fitting
Before fitting the cooker hood beneath any type of wall
cabinet ensure it is firmly fixed to the wall in accordance
with the manufacturers instructions.
1. Use the paper template provided to mark the hole
positions on the underside of the cabinet. Ensure
the front edges of the template are aligned with
the front edge of the cabinet carcase.
2. Check the distances are correct with a tape
measure as stated on the template. The four
holes are 5mm (1/4”) diameter.
3. If the ducting spigot is being used, cut a circular
hole, using a pad saw or similar cutter.
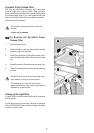
Fitting the Cooker Hood to the Wall
1. Lift the hood squarely to the wall slightly higher
than the brackets.
2. Lower the cooker hood until the cooker hood
locates onto the two brackets.
3. Ensure that the cooker hood is correctly located
before letting go.
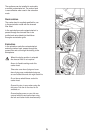
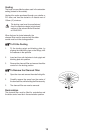
To Level the Cooker Hood
1. Remove the lower grille by pressing inwardly on
the two slide catches located towards either side
of the grille towards the front. The grille will open
from the front.
2. Slide the right edge of the grille forward until it
clears the guide and then unhook the left hinge
pin.
3. Support the grille when removing it from the
guides carefully.
4. The two levelling screws will be visible towards
either end of the back panel.