SW2 VGA DA2 A /AF • Installation and Operation
SW2 VGA DA2 A /AF • Installation and Operation
Installation and Operation, cont’d
2-5
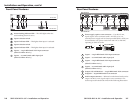
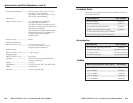
IN
P
U
T
S
1
2
A
(
L
O
C
A
L
M
O
N
I
T
O
R
)
B
1
2
I
A
S
L
R
A
S
/
R
E
M
O
T
E
S
W
2
V
G
A
D
A
2
A
F
O
U
T
P
U
T
S
E
X
T
S
W
IT
C
H
12V
0.5A MAX
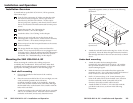
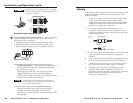
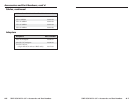
Under-desk mounting
Through-desk mounting
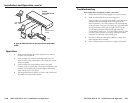
1. Hold the front panel of the switcher against the desk or
table. Use a soft pencil to mark the rough-in opening on
the desk. The opening, approximately 8.88" x 1.13"
(22.5 cm x 2.9 cm) will be slightly larger than the switcher
enclosure.
2. Cut out the material from the rough-in area with a jigsaw.
Check the opening size by inserting the switcher part way
through the hole. if needed, use a saw, file, or sandpaper
to enlarge the hole. Smooth the edges of the hole with
sandpaper.
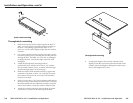
3. Attach the through-desk mounting brackets
(part #70-077-02) to the SW2 VGA DA2 A /AF with the
four provided machine screws, as shown in the through-
desk mounting diagram on the next page.
4. Hold the switcher with attached brackets up against the
underside of the desk or table. Use a soft pencil to mark
the locations of holes for the screws that will attach the
brackets to the desk.
5. Drill ¼" (6 mm) deep, 3/32" (2 mm) diameter pilot holes in
the desk or table at the marked screw locations. The holes
should be drilled from the underside or inside (concealed
side) of the furniture, where the switcher will be located.
6. Attach the switcher to the desk/table with the provided
wood screws, as shown in the following illustration.
2-4
A
U
T
O
S
W
I
T
C
H
Through-desk mounting
7. To adjust the height of the switcher within the desk,
slightly loosen the screws that attach the brackets to the
switcher, adjust the height by sliding the switcher up or
down, and retighten the screws.