


www.airkinglimited.com
00000000 Rev A. 4-06
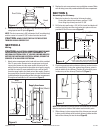
2. Connect the ducting to the duct collar and secure in place
using tape to seal all joints (Figure 4).
NOTE: The duct connector is 5.8" in diameter (for 6" round ducting)
and the center is located 3-3/16" inches from the back wall.
CAUTION: ALWAYS DUCT THE FAN TO THE OUTSIDE
THROUGH A WALL OR ROOF CAP.
SECTION 4
Wiring
CAUTION: ALL ELECTRICAL CONNECTIONS MUST BE MADE
IN ACCORDANCE WITH LOCAL CODES, ORDINANCES, OR
NATIONAL ELECTRICAL CODE. IF YOU ARE UNFAMILIAR WITH
METHODS OF INSTALLING ELECTRICAL WIRING, SECURE THE
SERVICES OF A QUALIFIED ELECTRICIAN.
1. Attach wire compartment to the hood with two of the provided
3.9 x 13 mm screws. Remove wire compartment cover and
connect the brown wire (on some models this wire will be
white) from the range hood to the white wire from the supply,
and the blue wire (on some models this wire will be black)
from the range hood to the black wire of the supply. Connect
the ground wires from the home (green or bare) and the hood
(green/yellow) to the grounding screw in the wire compartment.
Use approved methods for all connections (Figure 5).
3. Replace the wire compartment cover and tighten screws. Make
sure all wiring is securely contained within the wire compartment.
SECTION 5
Attaching the Chimney
1. Mark the location for the vertical chimney bracket:
If using the optional top chimney section: 13-3/8"
If not using top chimney section: 13-3/8"
2. Drill holes into wall using a 1/4" drill bit. Install included wall
anchors into holes and secure bracket into place with two
provided 3.19 x 32 mm screws (Figure 6).
2. Press in appropriate tabs on bottom chimney section (section
with vent holes). If using the optional top chimney, press in
tabs in middle of the chimney (Position A), otherwise press
in tabs at top of the chimney (Position B) (Figure 7).
NOTE: If the optional top chimney section (included) will be installed,
slide the top section inside of the bottom section at this point.
3. Slide chimney in place so top tabs of the chimney are secured
in place on the indents of the vertical chimney bracket and the
base of the chimney fits into the hood (Figure 8).
3 of 20
Figure 4
Ducting
Duct Collar
Hood
Figure 5
Grounding Screw
Hot (Black)
From Hood
Supply from home
White
BrownGround Hot (Blue)
Wire
Compartment
Figure 6
13-3/8"
or
13-3/8"
Vertical Chimney
Bracket
Side View
Details of duct collar, ducting, and electrical have
been omitted from drawing for clarity purposes.
Figure 7
AA
BB