


7
1. Find studs, using one of following methods:
• Stud finder--magnetic device which locates nails.
• Use hammer to tap lightly across mounting surface
to find solid sound. This will indicate stud
location.
Note: After locating stud or studs, stud center can be
found by probing wall with small nail to find edges of
stud. Place mark halfway between edges. Center
of any adjacent stud should be 16 inches or 24
inches from mark.
2. Draw line down middle of studs. Microwave must be
connected to at least one wall stud.
3. Draw vertical line on wall, at center of 30 inch wide
space.
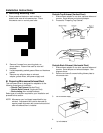
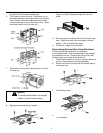
4. Use mounting plate as template for rear wall. Place
mounting plate on wall, verify tabs are against bottom
of cabinet. Line up notch and center line on mounting
plate to center line on wall.
5. While holding mounting plate with one hand, draw
circles on wall at holes A and B, marked on mounting
plate. See diagram below. Holes A and B are shown
by arrows stamped into mounting plate and must be
used for mounting. If holes are not used, improper
installation will occur. Use toggle bolts through these
holes unless one lines up with stud. Use wood screw
for stud. Set mounting bracket aside.
6. Draw third circle through one of top or bottom
holes to match location of stud.
NOTE: For outside back exhaust, microwave oven
requires rear wall cutout opening for rear wall
duct. See "Preparing Rear Wall Cutout Opening
for Outside Back Exhaust" section.
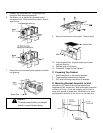
3. Verify exhaust adaptor (with damper) is squared up in
house duct and lines up with holes in mounting plate.
4. Attach 28 inch foam tape to front of mounting plate,
around both exhaust openings where it will touch
microwave oven.
NOTE: Exhaust must be aligned within space between
studs.
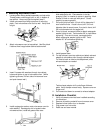
7. Drill holes through circles. Diameter of holes should
be 5/8 inch for toggle bolts and 3/16 inch for wood
screws on studs. Use at least 1 wood screw in stud,
and 2 toggle bolt assemblies into drywall or plaster.
8. Attach mounting plate to wall.
9. Remove toggle assembly from screws. Insert screws
into mounting plate and replace toggle assembly to
3/4 inch past screw ends. Insert toggle assembly into
holes in wall to mount bracket. Pull forward on
bracket to tighten toggle bolts.
If installation is other than outside back exhaust, proceed
to step F.
E. Preparing Rear Wall Cutout Opening for
Outside Back Exhaust
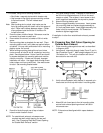
1. Place mounting plate against rear wall, as described
in diagram at left.
2. Using pencil, draw dots through holes D and E, and in
tips of notches G and F. Mark straight edges of H and
I for bottom line. This will give location and size of
box cutout for rear wall duct.