


USING YOUR RICE COOKER
To Steam Food And Cook Rice Simultaneously:
One of the most convenient features of this rice cooker is the ability to both cook
rice and steam food simultaneously, ideal for creating delicious, all-in-one meals.
1. Place the desired amount of rice and appropriate amount of water into the
inner pot. See “To Cook Rice” on page 4 for details.
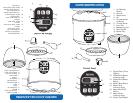
2. Place the inner pot into the unit and begin to cook the rice.
NOTE:
It is possible to steam at any point during the rice cooking cycle. However, it
is recommended that you steam during the end of the cycle so that
steamed food does not grow cold or become soggy before the rice is ready.
NOTE:
Do not attempt to cook more than 6 cups (uncooked) of rice if steaming and
cooking rice simultaneously. The steam tray will not fit.
3. Refer to the steaming guides for vegetables (page 9) or meat (page 10) for
hints and approximate steaming times. It is best to insert the food to be
steamed toward the end of the rice cooking cycle so that your meal is fresh
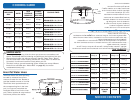
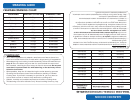
and warm all at once. See the “Rice/Water Measurement Table” included on
Page 6 for approximate rice cooking times.
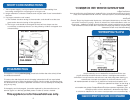
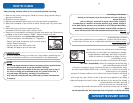
4. Place you
r c
hoice of vegetables or meat into the steam tray. Open the lid,
using caution as steam escaping will be extremely hot, and place steam tray
into the rice cooker.
5. Close the lid and allow the cooker to resume cooking.
6. Once food has been steamed for the appropriate time open the lid. Use
caution when opening the lid as steam escaping will be extremely hot. Remove
the steam tray and check food to be sure it has been thoroughly cooked.
Exercise caution when removing the steam tray
as w
ell, as it will be hot.
7. If the rice has not finished cooking, close the lid of the rice cooker and allow
rice to continue to cook until done. Once the rice is finished, the rice cooker will
automatically switch to “Keep-Warm” mode.
8. The rice cooker will remain on “Keep-Warm” mode until it is unplugged. Be sure
to unplug the cord from the wall outlet when not in use.
9
COMO USAR SU APARATO
Para Cocinar al Vapor y Guisar Simultáneamente:
Una de las ventajas mas convenientes de este producto consiste en la habilidad
de guisar y de cocer al vapor simultáneamente, ideal para crear deliciosas
comidas “todas en una.”
1. Coloque la cantidad deseada de arroz así como la cantidad apropiada de
agua en la olla interior. Para detalles vaya a la página 4 de la sección “Para
Cocinar Arroz”.
2. Coloque la olla interior en la unidad y empiece a cocinar el arroz.
NOTA:
Se puede cocinar al vapor durante cualquier parte del ciclo de cocimiento
de arroz; sin embargo le recomendamos que cocine al vapor hasta el final
del ciclo para que la comida no se enfríe o se vuelva apelmazada o
mojada.
NOTA:
No intente cocinar mas de 6 tasas de arroz (crudo sin cocer) si desea guisar
y cocer simultáneamente, ya que la charola de vapor no cabrá.
3. Para sugerencias y para tiempos aproximados de cocimiento al vapor, por
favor recurra a las guías para cocer al vapor verduras (página 9) y carnes
(página 10). Le aconsejamos meter la comida que va a ser cocida al vapor
hasta el final del ciclo para guisar arroz, para que su comida esté fresca y
caliente al mismo tiempo. Para tiempos aproximad
os d
e cocimiento, vea las
“Tablas de Medidas de Arroz/Agua” incluidas en la página 6.
4. Coloque sus verduras o carnes seleccionadas en la charola de vapor; abra la
tapa, y con mucha precaución, ya que el vapor que sale es extremadamente
caliente, coloque la charola en la olla de presión.
5. Cierre la tapa y permita que la olla continúe cocinando.
6. Una vez que la comida ha sido cocida al vapor por el tiempo indicado, abra la
tapa con precaución y retire la charola de vapor. Verifiq
ue q
ue su comida
haya sido debidamente cocinada. Ejerza precaución cuando separe la olla de
vapor ya que tendrá altas temperaturas.
7. Si el arroz no ha finalizado su cocimiento, cierre la tapa de la olla y permita que
el arroz continúe su cocimiento hasta que esté listo. Una vez terminado el
proceso la olla automáticamente cambiará a la modalidad de “Keep-Warm”.
8. La olla permanecerá en la modalidad “Keep-Warm” hasta que se desenchufe.
Asegúrese de desconectar el cordón cu
ando n
o se esté usando.
9