


8
OPERATION
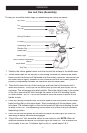
Use and Care (Assembly)
To use your
smoothie maker
, begin by assembling the mixing container.
smoothie maker, begin by assembling the mixing container.smoothie maker
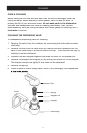
1. Position the rubber gasket down onto the circular fl at surface in the blade base.
2
.
Screw b
lade base on the bottom of the mixing
container
by twisting the blade
base counter-clockwise until tightened onto the mixing
container
. Make sure that
container. Make sure that container
the blade base is tightly fastened to the
container
and that the rubber gasket is
properly compressed between the
container
and the blade base.
3
.
Place
the lid onto the top of the mixing jar and twist the lid clockwise until it
locks into position. The lip on the lid should line up with the pour spout on the
container. This will engage the safety switch. Place the clear lid cap in the center
of the lid or place the stir stick through the center of the lid if blending liquids
or frozen drinks. NOTE: The lid and container must be locked in place for the
blades to spin.
4. Place the mixing
container
onto the motor base so that the bottom of the blade
base is sitting fl at on the motor base. Twist clockwise until the container locks
into place. The indicator light on the control panel will light up indicating the unit
is ready to turn on. The dispensing valve should line up with the auto-powered
dispensing button.
5. Once the lid and the goblet are locked into place the ready light will come on
indicating all safety switches are engaged.
6
.
Plug in the cord. Your
smoothie maker
is now ready to use
!
NOTE:
When all
interlock switches ar
e active the indicator light will come on. This in
dicates the
unit is ready to tu
rn on. If indicator light is not on
,
rep
eat steps 3
& 4.
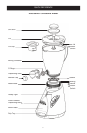
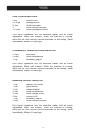
Mixing
Container
Stir Stick
Blender Cap
Blade Base
Lid Cap
Dispensing Valve
Auto-Powered Dispensing
Button
Lid
Motor Base
Drip Tray
O Rings
Gasket
Gasket
Ready
Light