


Gas Pressure Fryer Operation
13
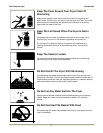
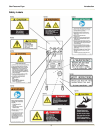
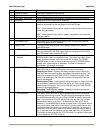
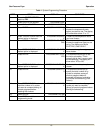
Item Description Function
1 Pressure Gauge Indicates the pressure inside the pot.
2 Spin Handle Used to tighten the lid to the pot once it is latched.
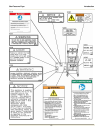
3 Pop Safety Valve lever Used to release pressure periodically to prevent the seat from sticking.
4 Computer Used to set and activate product programs.
5 Rocker Switch FILTER – When placed in this position, power is applied to the motor and
shorting is pumped into the pot directly or thru the fill hose.
OFF – When placed in this position, power is removed from both the pump
motor and gas system.
FRY – When placed in this position, power is supplied to the thermostat
and gas system.
6 Thermostat Knob Used to set the temperature of the shortening.
7 Thermostat Light Illuminates when the thermostat calls for heat. Extinguishes when the
shortening temperature is reached.
8 Digital Timer The digital timer consists of an LED, display, beeper and 8 buttons
described below:
LED indicator Prior to the start of a timing cycle the LED will be OFF. When running a
timing cycle the LED will flash. At the end of a timing cycle the LED will
turn ON steady. When idle the LED is off.
TIME SELECT (2 arrow
buttons)
Two arrow buttons on the front panel are used to set the time. Hold the UP
ARROW button down to increase the time. The longer the button is held
down, the faster the rate at which the time will increase. The DOWN
ARROW button is used in the same manner as the UP ARROW button
except it will cause the time to decrease. The time is increased or
decreased in 30-second increments.
START/STOP button Starting the Timer - Pressing this button while the timer is not active will
cause the timer to begin counting down the time on the display.
Stopping the Timer - Pressing this button while the timer is active will
stop the timer from counting down and display the remaining time. Time
cannot be changed with the TIME SELECT buttons at this point. If this
button is pressed again the timer will continue counting down from the
point it was stopped.
Resetting the Timer - Pressing and holding this button for longer than two
(2) seconds will reset the timer and the display will return to the original
starting time. At this point, time can be changed using the TIME SELECT
buttons or the preset buttons.
Canceling The STIR OIL Function - Pressing this button cancels the
STIR OIL function while it is active.
ALARM button This button allows the user to set an elapsed time at which the internal
alarm will sound during a cycle. The time is set by pressing and holding
the ALARM button while using the UP and DOWN arrows to change the
time. The controller will limit the alarm time to be less than the currently
programmed interval cycle time. The default alarm time is 0:00 which
disables it. The ALARM time is saved on power down in the same manner
as the last interval time. When a time cycle is running and the alarm time
has elapsed the internal alarm will sound for 10 seconds. For example, a
cycle time 10:00 and alarm time of 2:00 would cause the alarm to sound
for 10 seconds once the controller has counted down from 10:00 to 8:00.
This button is used to cancel the STIR OIL alarm. This button is also used
to reconfigure the STIR OIL Function.