


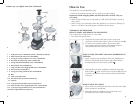
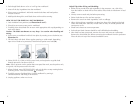

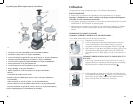
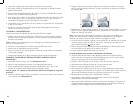


3. If using the large workbowl, place the wide-mouth feed chute on top of the
cover with the small tab to the right of the workbowl’s handle. Turn clockwise
until it clicks into position over the handle.
4. Insert the food pusher into the central tube of the wide-mouth feed chute. Turn
clockwise to lock in place. The pusher is used to guide foods through the feed
chute and can be removed when adding liquid or additional foods while the
processor is running. To remove, turn counterclockwise.
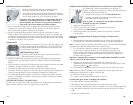
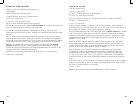
The controls are located on the front of the base . Press
PULSE (P), HIGH or LOW to select a function (see directions
below).
• Processor should be stored in OFF position and unplugged
when not in use.
• Use PULSE (P) for short processing tasks. This lets you control the size and
uniformity of foods being chopped.
• The OFF/PULSE (O/P) button must be pressed and held for the appliance to
operate in PULSE mode. When released, the appliance will stop.
• The motor of the processor will run as long as the OFF/PULSE (O/P) button
is held down. Press the button and then release to allow the blades to stop
running and the food to fall to the bottom of the workbowl.
• Pulsing gives better control when chopping, mincing, mixing and blending
foods. You can control the size of the foods, from coarse to fine.
When either speed is selected, the processor will run continuously until the OFF/
PULSE (O/P) button is pressed.
The chopping blade is used to coarsely or finely chop, mince, mix and puree
foods to a smooth consistency.
1. Lock workbowl into position (see ).
2. Hold chopping blade by center shaft and insert onto center
post .
3. Place food in workbowl.
4. Place cover on workbowl and lock into place by rotating
clockwise (see ).
5. When using large workbowl, place the wide-mouth feed chute and food
pusher in place.
6. Select your desired speed (PULSE (P), LOW or HIGH).
Process foods for no more than a few seconds at a time. Pulsing produces
excellent results and offers greater control.
7. If using small workbowl, press OFF/PULSE (O/P) and wait for blades to stop
revolving. If using large workbowl, food can be added while processor is
running; remove food pusher and insert food through the feed chute.
Replace food pusher in chute.
8. Press the OFF/PULSE (O/P) button and allow blades to stop revolving before
removing cover. Twist cover toward to remove.
9. Unlock workbowl by turning it counterclockwise and lift off base.
Remove bowl from appliance before removing blade to prevent food from
leaking through the center opening of the bowl.
10. Carefully remove chopping blade.
11. Unplug appliance when not in use.
• The processor works very quickly.
• Watch carefully to avoid over-processing foods.
• The PULSE (P) button offers the best control and results.
• For best results, process foods that are about the same size.
• Do not overload the bowl.
• Never walk away from the processor while it is on.
• Use hot but never boiling liquids.
• Do not process more than ¾ cup liquid in the small workbowl and 3 cups
liquid in the large workbowl at one time.
• To process meat, use no more than ¾ cup in the small workbowl and 2 cups
of ¾-inch cubes. Process using PULSE (P) in 5 second intervals.
• The small workbowl has a capacity of 3 cups and the large workbowl has a
capacity of 10 cups.
• Insert a funnel into the feed chute when adding ingredients such as, oil, flour
and sugar.
This blade makes preparing dough and pastry efficient and time-saving.
1. Use this blade in the large workbowl. This blade does not extend to the
outside rim of the workbowl, so it cannot incorporate flour when very small
amounts of flour are being processed.
Use the metal blade for mixtures that contain less 2 cups of flour.