


6
ENGLISH
This appliance is double insulated in
accordance with EN 60335-2-14;
therefore no earth wire is required.
• To avoid the risk of electric shock, do not
immerse the cord, plug or motor unit in water
or other liquid.
• Check that the supply voltage shown on the
rating plate of the appliance matches that of
your electrical system. Any connection error
will invalidate the guarantee.
Mains plug replacement
If a new mains plug needs to be fitted:
• Safely dispose of the old plug
• Connect the brown lead to the live terminal
of the new plug
• Connect the blue lead to the neutral terminal
• If the product is class I (earthed), connect
the
green/yellow lead to the earth terminal
Warning! If your product is class II double
insulated (only 2 wires in the cord set), no
connection is to be made to the earth terminal
• Follow the fitting instructions supplied with
good quality plugs
• Any replacement fuse must be of the same
rating as the original fuse supplied with the
product.
Warning! The above section on mains plug
replacement is for authorized service centre
personals.
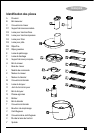
Assembly
Wash all detachable parts (see chapter
‘Maintenance and cleaning’).
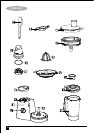
Assembling the food processor
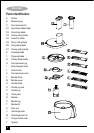
1. Fit the food processor jug (H) onto the food
processor base (I), secure it by turning it
clockwise.
2. For chopping or kneading fit the required
blade (F or E) onto the primary blade holder
(G).
3. For shredding or slicing, fit the required blade
(D2, D3, D4, D5, D6 or D7) into the
secondary blade holder (D1).
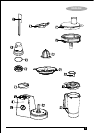
4. Place the assembled blade and holder into
the food processor jug (H).
5. Fit the food processor lid (C) and secure it by
turning it clockwise.
6. Fit the measuring jug (B) into the pusher (A)
and then place the pusher into the food
processor lid.
Note: The blender cover (M) must be in place
for the food processor to work.
Assembling the blender
1. Remove the blender cover (M) from the food
processor base by turning it clockwise and
lifting it off.
2. Place the blender jug (S) onto the blender
drive (L) and secure it by turning
anti-clockwise.
3. Fit the blender lid (T) to the blender jug (S)
and secure it by turning it anti-clockwise.
4. Fit the filler cap (U) to the blender lid (T) and
secure it by turning it anti-clockwise.
Assembling the grinder
1. Fit the grinder jug seal (O) into the grinder
jug (P).
2. Fit the grinder blade (N) into the grinder jug
and secure by turning it clockwise.
3. Place the grinder jug (P) onto the blender
drive (L) and secure it by turning
anti-clockwise.
Assembling the citrus Juicer
1. Fit the food processor jug (H) onto the food
processor base (I), secure it by turning it
clockwise.