


Meat Mincer
2
nearest service center.
– Never attempt to replace the
appliance's power cord since this
requires special tools. Always ensure
the appliance is repaired or the power
cord replaced by a service center
authorized by the manufacturer in
order to assure its safety.
– Do not submerge the power cord,
motor housing and plug in water or
other liquids since this could cause
fire, electric shocks or injuries.
– This appliance may not be connected
to power during cleaning.
– Do not touch any rotating parts.
– Keep your hair, fingers and utensils
away from all rotating parts to avoid
severe injuries to persons and
damages on the appliance.
– The blades are sharp; handle them
with care.
– Turn off power and unplug appliance,
before exchanging accessories or
attachments which are moved during
operation.
– Prevent possible injuries through
faulty handling. Be careful in handling
sharp blades when emptying the
meat mincer and during cleaning.
– Never operate appliance with
damaged accessories. Examine
the appliance and accessories for
damages prior and after each use.
– Handle the accessories with care.
The blades of the knives may cause
injuries.
– Prior to use, ensure that no foreign
objects are in the meat mincer.
– Never feed food by hand. Always use
food pusher.
– Do not use fingers to scrape food
while appliance is operating. Cut type
injury may result.
SAVE THESE
INSTRUCTIONS
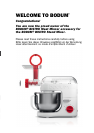
USE THIS ATTACHMENT ONLY
TOGETHER WITH THE BISTRO
STAND MIXER MODEL 11381!
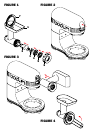
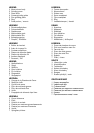
LEGEND
1 Meat mincer body
2 Grinding worm
3 Steel knife
4 Coarse grinding plate
5 Fine grinding plate
6 Ring
7 Food pusher / wrench
MEAT MINCER ASSEMBLY
(Fig. 1)
1. Insert the grinding worm (2) into the
mincer body (1).
2. Place the knife (3) over the square
shaft at the end of the grind worm (2).
3. Place grinding plate (4 or 5) over
the steel knife (3). Make sure you
match the tabs of the plate with the
notches of the mincer body.
4. Place the ring (6) on mincer body
and turn by hand until secured (not
too tight).
NOTE: Use the food pusher / wrench
(7) for removal only, do not use to
tighten the ring (6).