7
PANINI PREPARATION (Continued)
3. Assemble panini. Brush or spray both sides of the outside of the
sandwich with olive oil, butter or margarine. When the Green
READY Light goes out, your panini are ready to grill.
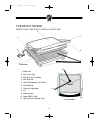
4. Using a pot holder or oven mitt, hold the top cover (Lid) open
when placing or removing food on the cooking surface to
prevent accidental closing and injury.
5. Using a pot holder or oven mitt, center one or two panini, oiled
side down, on the bottom Grilling Plate.
6. Grasp the Cool Touch Grip and pull down the Metal Arm to
gently lower the top Grilling Plate. The Floating Hinge system
will adjust to the thickness of your panini automatically. To
ensure a perfectly grilled sandwich, make sure that the top
Grilling Plate lies evenly on the top of the oiled panini.
7. During grilling, the Green READY Indicator Light will cycle on
and off during cooking. This indicates that the thermostat is
maintaining the proper cooking temperature to grill panini
to perfection.
Make sure that the cord is kept well away from the Grilling Plates
when in use.
8. Grill until the bread is toasted to your liking.
9. To remove your grilled panini, always use a plastic or wooden
spatula.
Never use a sharp or metal object as it may damage the non-stick
surface of the Grilling Plates.
10. Allow panini to cool to a safe handling temperature
before slicing.
11. Disconnect the plug from wall outlet when not in use.
NOTE:
NOTE:
TR456_ 1/28/03 4:02 PM Page 9


