


40 41
CARE & CLEANING
g) Empty drip tray and reinsert into
position. Use caution as the drip tray
may be hot due to the water and steam
from the boilers.
h) Press SELECT dial to proceed to next
step.
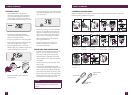
Step 5 – Fill Boilers
During Step 5 procedure, the grind LCD
will display '05'.
a) 5 minute timer will begin. During this
time, water may flow through the group
head. Wait for countdown timer to
reach 0:00. This allows any remaining
solution to be removed from system.
Step 6 – Flush Boilers
During Step 6 procedure, the grind LCD will
display '06' and the main LCD will display
'PUSH'.
a) Empty and rinse water tank. Assemble
new water filter into tank.
b) Fill water tank with cold water to MAX
line. Replace and lock water tank back
into position at the back of the machine.
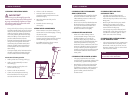
c) Ensure drip tray is empty and fully
inserted into position.
d) Place a cloth over the drip tray to stop
steam escaping.
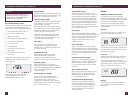
e) Use a flat-head screwdriver to rotate the
right screw counter-clockwise until the
valve is fully open. As the valve opens,
steam may be released.
CAUTION
HOT WATER & STEAM
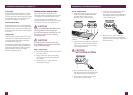
f) Next, repeat the above process on the
left screw. As the valve is opened, water
may begin flowing into the drip tray.
g) Allow valves to remain open until no
more water or steam escapes.
h) Close both valves by rotating screws
clock-wise until seated. Do not
overtighten screws to avoid damaging
the valves. Replace the grey silicone
cover over the valves.
i) Empty drip tray and reinsert into
position. Use caution as the drip tray
may be hot due to the water and steam
from the boilers.
j) Press SELECT dial to complete descale
procedure. Machine will heat up and is
ready to use once operating temperature
(STANDBY mode) is reached.
CARE & CLEANING
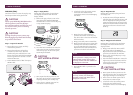
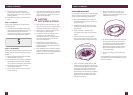
USING THE ALLEN KEY
Over time, the silicone seal surrounding the
shower screen will need to be replaced to
ensure optimum brewing performance.
1. Press the POWER button to turn the
machine off and unplug the cord from
the power outlet.
2. Carefully remove the rear water tank
and drip tray, taking particular care if
they are full.
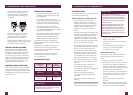
3. Using a skewer or similar, clean
the center of the screw of any residual
coffee.
4. Insert the shorter end of the Allen
Key into the center of the screw. Turn
counter-clockwise to loosen the screw.
Clean center of screw
before inserting Allen Key
5. Once loosened, carefully remove and
retain the screw, stainless steel shower
screen and black dispersion plate. Make
note of the side of the shower screen
and dispersion plate that are facing
downwards. This will make re-assembly
easier. Wash the shower screen and
dispersion plate in warm soapy water,
then dry thoroughly.
6. Remove the silicone seal with your
fingers or a pair of long-nose pliers.
Insert the new seal, flat side first, so the
ribbed side is facing you.
7. Re-insert the dispersion plate, then the
shower screen, then the screw. With
your fingers, turn the screw clockwise
for 2–3 revolutions then insert the
Allen Key to tighten until the screw is
flush with the shower screen. Do not
overtighten screw.
8. Re-insert the drip tray and rear water
tank.
Contact Breville Consumer Support or visit
www.breville.com for replacement silicone
seals or for advice.