


Page 9B101278-2-1008
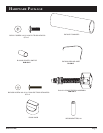
Recommended Tools
These items are recommended for the assembly of your
grill:
• Phillips screwdriver
• Adjustable wrench set
• Socket set
• Soapy water solution (to test for leaks)
• Liquid soap (for foam grip)
Grill Mountings
Assemble your base option before assembling your Broil-
master grill head.
Refer to the Broilmaster Cart, Base, and Post instructions
provided with each accessory for assembly, installation, and
mounting procedures.
Before You Begin
All Broilmaster grills require some assembly and installation.
Follow all instructions unless noted to apply only to other
specific models.
If you purchased an accessory with your Broilmaster, follow
the instructions provided with the accessory for assembly
and installation. If an instruction refers to a step that is not
required for your grill model, please continue to the next
step.
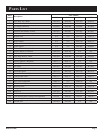
In each step, parts are identified with “Key” numbers. Key
numbers appear in parenthesis after a part name is mentioned
for the first time in the instructions. You can reference each
part by its key number on the Parts List if you need help in
identifying a part.
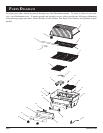
Compare the parts found in the shipping container to the
parts list provided. If any parts are missing contact your
Broilmaster dealer before beginning assembly.
CAUTION: FOR YOUR SAFETY
Parts may have sharp edges. Wear leather work
gloves and handle parts carefully during the unpack-
ing, assembly and installation.
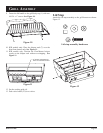
GRILL ASSEMBLY
CAUTION: Hood Position
Due to the intense heat generated by the Broilmaster burner
system, cooking with the hood closed can only be done
with the control knobs set on LOW. The control panel label
clearly indicates the highest safe setting for cooking with
the hood closed.