


SBB00101-1-1007Page 12
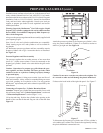
ROTISSERIE INSTALLATION for SBG2501-1 & SBG2801-1
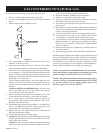
Using the Ignitor
Caution: If burner fails to light after 5 seconds, turn the burner
OFF for 5 minutes, to allow the gas to clear, then try again.
Attention: You must use the control knob that is second from the
left side of grill to ignite the rotisserie.
1. Turn the control knob clockwise
to the OFF posi-
tion.
2. Turn ON gas supply to grill.
3. With the grill lid open, push and turn the rotisserie control
knob counterclockwise to ON.
4. Push and hold the ignitor button until the rotisserie burner
ignites.
Attention: When igniting the rotisserie burner, hold rotisserie
control knob in for 30 seconds in order to energize the thermo
-
couple.
5. If rotisserie burner does not ignite, turn rotisserie control knob
clockwise
to the OFF position. Turn OFF gas supply
to grill. Refer to Troubleshooting section in this manual.
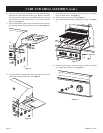
Before rotisserie cooking you will need to remove the warming rack
and the Cooking Grids from your grill. When Rotisserie Cooking
you can place a Cooking pan under the food to be cooked. This will
capture the drippings and keep your grill clean of excess grease
which could cause a fire. Use caution when moving a cooking pan
containing hot oils.
The Rotisserie Motor is rated to turn a maximum load of 12
pounds.
Warnings:
Never use the Rotisserie Motor in the rain, and never use it if it
has become wet.
Always use a grounded three-prong outlet and a three-prong exten
-
sion cord to energize the Rotisserie Motor.
Never alter or remove the grounding prong on the Rotisserie Power
Cord, as an electric shock hazard would then result.
Never permit an electrical supply cord or gas supply line to
contact any heated surface of this grill.
WARNING
The Rotisserie Motor must be electrically grounded in accordance
with local codes or, in the absence of local codes, with the National
Electric Code, ANSI/NFPA 70. Keep the Rotisserie Motor electric
cord away from the heated surface of the grill. Do not operate the
Rotisserie with a damaged cord or plug, or if the Rotisserie malfunc
-
tions or has been damaged in any manner. Call the Customer Service
for replacement. The power supply cord has a 3-prong grounded
plug. For your personal safety do not remove the grounding prong.
It must be plugged into a mating 3-prong grounding type receptacle,
grounded in accordance with the National Electrical Codes and lo-
cal codes and ordinances. If an extension cord is used, it must be
properly grounded and suitable for use with Outdoor Appliances.
Keep the extension cord connection dry, off of the ground and out
of the reach of children. When the Rotisserie Motor is not in use,
remove and store in a dry area.
Rotisserie Use
Warning: Do not operate the side burner option simultane-
ously with the rotisserie. The side burner will melt the rotisserie
handle.
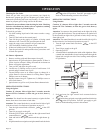
Secure meat firmly to the spit rod with meat holders (It may be
necessary to tie fowl and rolled roasts to retain their shape for even
rotation). To ensure proper rotation, it is important to adequately
balance and fasten the meat or fowl onto the spit rod.
Before heating the grill, rotate the spit rod and meat manually a
few times. If out of balance, attach the counterbalance assembly
to the spit to even out the weight and rotate again.
During cooking, adjust the meat holders if the meat shrinks and
pulls away from the spit rod. Use gloves and caution to prevent
burns.
Be certain that the rotisserie brackets and motor are secured in place,
then light the burner and close the grill lid for preheating.
After preheating, place the loaded spit rod into position. Start the
rotisserie motor and make certain the food is properly balanced.
Close the grill lid.
Note: Beef and pork roasts and certain types of fowl will release
a considerable amount of fat and juice in the process of cooking
and are therefore “self-basting.” Lean meat and chicken will taste
better if basted occasionally with melted butter, margarine, salad
oil, barbeque sauce or a sauce of your own preference.
The exact degree of “doneness” can be determined by the use of
a meat thermometer.
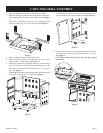
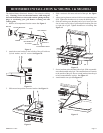
ROTISSERIE COUNTERBALANCE
SCREW JAMB NUTS ONTO ROD UNTIL SNUG AGAINST
COUNTERBALANCE. COUNTERBALANCE CAN BE
ADJUSTED VERTICALLY FOR BEST WEIGHT DISTRIBU-
TION.
Figure 14