


ENERGY-SAVING TIPS
Surface Cooking
Cook fresh vegetables with a
minimum amount of water in a
covered pan.
Watch foods when bringing them
quickly to cooking temperatures at
high heat. When food reaches
cooking temperature, reduce heat
immediately to lowest setting that
will keep it cooking.
When boiling water for tea or coffee,
heat only amount needed. It is not
economical to boil a container full of
water for one or two cups.
Use correct heat for cooking task:
HI–to start cooking (if time allows,
do not use high heat to start).
MEDIUM–quick browning.
LOW–finish cooking most quantities,
double-boiler heat, and for small
quantities.
VARI-FLAME
TM
FRONT BURNERS
SIM–to maintain serving temperature
of most foods.
Oven Cooking
Preheat oven only when necessary.
Most foods will cook satisfactorily
without preheating. If you find
preheating is necessary, preheat for 10
to 12 minutes.
Always turn oven OFF before
removing food.
During baking, avoid frequent door
openings. Keep door open as short a
time as possible.
Cook complete oven meals instead of
just one food item. potatoes, other
vegetables, and some desserts will
cook together with a main-dish
casserole, meat loaf, chicken, or roast.
Choose foods that cook at the same
temperature and in approximately the
same time.
Use residual heat in the oven
whenever possible to finish cooking
casseroles, oven meals, etc. Also add
rolls or precooked desserts to warm
oven, using residual heat to warm
them.
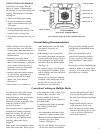
GENERAL INFORMATION
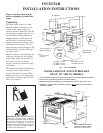
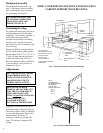
• Range may be installed directly
against rear walls and side base
cabinets. It may not be installed
directly against side tall cabinets,
sidewalls, or tall appliances. See
“Wall Clearances” Figure 1 & 6.
• Electrical requirements: 120 volts,
60 Hz, 15 amps. Dual-fuel ranges
120/240 volts, 60 Hz, 20 amps.
• Natural gas: 4.0” WC, propane
10.0” WC.
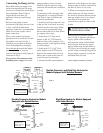
• Residential exhaust vent hoods
may be installed above the range.
Provide properly sized exhaust
fans for efficient operation, no
sprinklers are required.
• If this range is removed for any
reason, service or cleaning, etc., it
must be replaced as outlined in
the installation instructions before
placing the range back in operation.
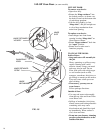
Field Adjustments
All ranges are tested before leaving the
factory. Field adjustments are necessary
for proper operation. The range must be
installed and adjusted by a qualified
technician. Final adjustments and/or
conversions from one gas to another
are not covered under the warranty.
Contact your dealer for the name of
their authorized Service Agency. If
none is available, contact the corporate
office for the nearest authorized
Service Agency in your area. Phone
(800) 251-7485.
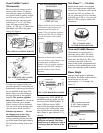
Top Burners
All burners have electronic ignition.
Standard top burners have “manual”
ignitors. Sealed top burners (if
equipped), oven burners, griddle and
grill burners have flame-sensing
ignitors.
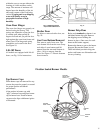
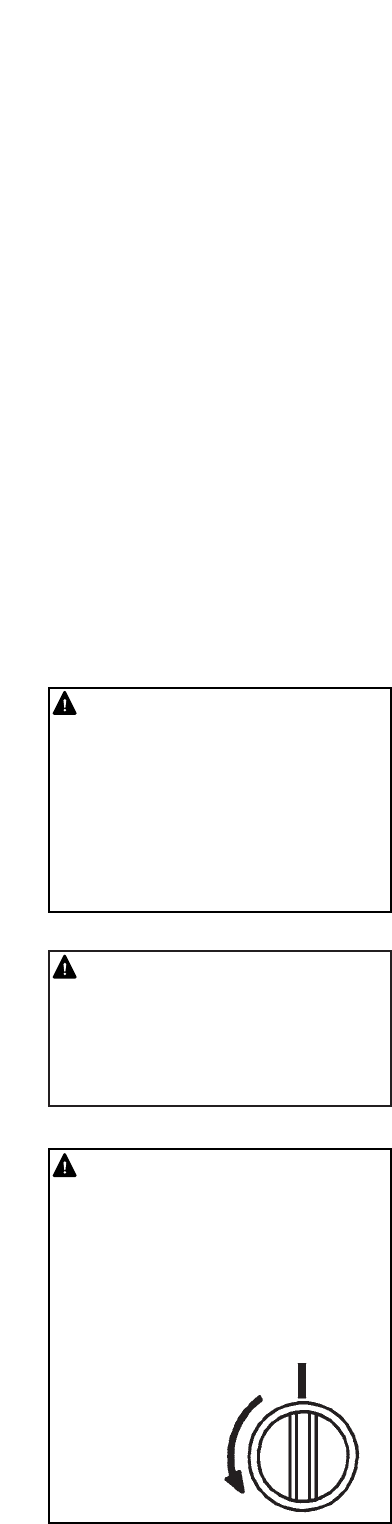
To light the top burners, push the knob
in and turn counter-clockwise to the
“LITE” position. As soon as the knob
reaches the “LITE” position, you’ll
hear a “clicking” sound. The knob
operates both a gas valve and an
electric switch. If you don’t hear a
clicking sound, turn the knob off and
check the electric connection, fuse or
circuit breaker if necessary. After
ignition, on standard burner models,
rotate the knob slightly clockwise out
of the “LITE” position. This turns off
the electricity to the electrodes and the
clicking will stop. DON’T LEAVE
THE KNOB IN THE “LITE”:
POSITION . . . it will shorten the life
10
WARNING!!!
DUAL-FUEL MODELS ARE
NOT SUPPLIED WITH A
CONNECTION CORD. IF NOT
PROPERLY GROUNDED,
SEVERE SHOCK CAN OCCUR.
PUSH IN
TURN COUNTER
CLOCKWISE
ONLY
OFF
WARNING!!!
ALL GAS MODELS ARE
EQUIPPED WITH A POWER
CORD WITH A THREE PRONG
GROUNDING PLUG FOR
YOUR PROTECTION. DO NOT
CUT OR REMOVE THE
GROUNDING PRONG FROM
THIS PLUG.
CAUTION!!!
ALL CONTROLS ROTATE
COUNTER-CLOCKWISE TO
OPERATE. NEVER ROTATE
CONTROLS CLOCK-WISE
FROM THE "OFF" POSITION.
THIS WILL DAMAGE
CONTROLS AND
VOID WARRANTY
CLAIMS.