


7
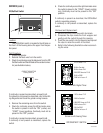
TROUBLESHOOTING
A troubleshooting guide is provided to suggest probable causes and remedies for the most likely problems
encountered. If the problem remains after exhausting the troubleshooting steps, contact the Bunn-O-Matic Tech-
nical Service Department.
• Inspection, testing, and repair of electrical equipment should be performed only by qualified
service personnel.
• All electronic components have ac voltage and dc voltage potential on their terminals. Shorting
of terminals or the application of external voltages may result in board failure.
• Intermittent operation of electronic circuit boards is unlikely. Board failure will normally be per-
manent. If an intermittent condition is encountered, the cause will likely be a switch contact or a
loose connection at a terminal or crimp.
• Make certain that all electrical connections are tight and isolated.
WARNING
• Exercise extreme caution when servicing electrical equipment.
•Turn power OFF when servicing, except when electrical tests are specified.
• Follow recommended service procedures.
• Replace all protective shields or safety notices.
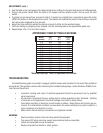
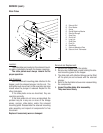
APPROXIMATE TIMER SETTINGS IN SECONDS
Weight Fine Drip Regular
(ounces) (7*) (8*) (12*)
1.5 0.5 0.5 0.5
1.75 0.7 0.6 0.6
2.0 1.0 0.8 0.8
2.25 1.4 1.4 1.2
2.5 1.9 1.8 1.6
2.75 2.4 2.2 2.0
3.0 2.9 2.7 2.5
3.25 3.3 3.1 2.9
4.0 4.8 4.4 4.0
6.0 8.6 7.9 7.5
8.0 12.0 11.5 10.9
10.0 15.7 15.1 14.1
12.0 19.6 18.5 17.5
14.0 23.5 22.0 20.9
16.0 27.0 25.3 24.3
*Hash mark settings. Refer to
Adjustment-Burr
section.
3. Use the table on the next page to find approximate timer setting for the grind and amount of coffee desired.
4. Plug-in the grinder. Select either the right or left hopper with the selector switch. Do not press the start
switch.
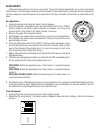
5. If grinder has an analog timer, proceed to step 6. If grinder has a digital timer, momentarily press the center
(DISPLAY) button on the dispense timer panel. The readout will indicate the present timer setting in seconds
and will remain displayed for five minutes.
6. Adjust the timer setting to obtain the desired amount of coffee for the selected hopper.
7. Verify the setting by weighing a few samples. Use the following table as an approximate guide only.
8. Repeat steps 4 thru 7 for the other hopper.
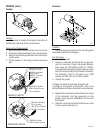
ADJUSTMENTS (cont.)
10218 051603