14
Triac Assembly Removal and Replacement
NOTE - Each triac installation requires the use of an
approved silicone heat sink compound. Bunn-O-Matic
recommends the use of Dow Corning 340 compound
or equivalent. It can be purchased direct from Bunn-
O-Matic (P.N. M2522.1000)
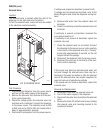
1. Remove the existing triac assembly held in place
with a 10-32 hex keps nut.
2. Apply a small amount of the silicone heat sink
compound to the copper heat sink.
SERVICE (cont.)
Electronic Controls (cont.)
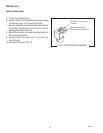
3. Securely fasten the new triac assembly to the
rear panel in the same relative position as the one
removed. Bunn-O-matic recommends tightening
the nut to a torque setting of approximately 18
inch-pounds.
4. Disconnect the other ends of the old triac assembly
wires.
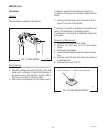
5. Connect the TAN and BLU wires with spade termi-
nals of the new assembly to the electronic control
assembly, FIG. 2.
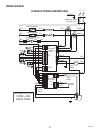
6. Connect the BLU wire with the ring terminal to the
tank heater, FIG. 12.
7. Connect the WHI/VIO wire of the new assembly to
the RED terminal at the terminal block.
10889 091599


