


Page 9
COFFEE BREWING
WITHOUT A SMART FUNNEL AND MHG or DBC GRINDER:
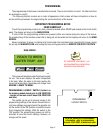
1. Begin each brew cycle with a clean empty brew funnel.
2. Insert a BUNN filter into the funnel.
3. Pour the fresh coffee into the filter and level the bed of grounds by gently shaking.
4. Slide the funnel into the funnel rails of the selected side until it stops.
5. Place an empty server under the funnel.
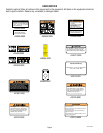
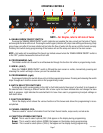
6. The "ENABLE BREW ON/OFF" switch for the selected side must be ON. Select the desired batch size.
7. Momentarily press and release the assigned BREW button. There may be certain situations in which the brew
cycle will not begin when BREW is pressed:
a. SWITCH NOT ON - "ENABLE BREW ON/OFF" switch must be ON.
b. BREW TEMPERATURE TOO LOW - wait until heated, or cancel BREW LOCKOUT option.
c. CHECK FUNNEL - remove funnel, empty previously brewed grounds and replace with fresh.
d. DISABLED - select different brew button or batch size.
8. If none of the above messages are displayed, the display will read NOW BREWING and show the time remain-
ing in the brew cycle.
9. Following the brew will be a countdown of drip time DRIPPING which shows the time remaining until the
coffee no longer drips from the funnel tip.
10. Carefully remove the brew funnel and discard the grounds and filter only after visible dripping stops.
WITH A SMART FUNNEL AND G9-2T DBC or MHG GRINDER:
1. Select the small batch size on the grinder.
2. Insert a BUNN filter into the funnel.
3. Grind the selected amount of fresh coffee into the Smart Funnel using the G9-2T DBC or MHG with Smart
Funnel operation and level the grounds by gently shaking.
4. Slide the funnel into the funnel rails of the selected side. The brewer will read the coffee name and size ground
through the chip in the funnel handle.
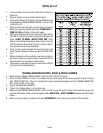
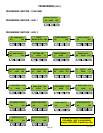
NOTE - The brewer will automatically match the brew batch size to the grinder batch size:
GRINDER BREWER
Small Half Batch
Medium Full Batch
Large *Full Batch
*If BREW is pressed with a large grinder batch, the display will read: INCORRECT GRIND...BATCH SIZE WRONG,
and then PRESS BREW TO BREW ANYWAY.
5. Place an empty server under the funnel.
6. The "ENABLE BREW ON/OFF" switch for the selected side must be ON.
7. Momentarily press and release the assigned BREW button. There may be certain situations in which the brew
cycle will not begin when BREW is pressed:
a. SWITCH NOT ON - "ENABLE BREW ON/OFF" switch must be ON.
b. BREW TEMPERATURE TOO LOW - wait until heated or cancel BREW LOCKOUT option.
c. CHECK FUNNEL - remove funnel, empty previously brewed grounds and replace with fresh.
d. INCORRECT GRIND - Indicates a large batch was ground using the grinder. Check batch size.
8. If none of the above messages are displayed, the display will read NOW BREWING and show the time remain-
ing in the brew cycle. Arrows will point to the side that is brewing. If both sides are brewing simultaneously,
the arrows will alternate from left to right on the display.
9. Following the brew will be a countdown of drip time DRIPPING which shows the time remaining until the
coffee no longer drips from the funnel tip.
10. Carefully remove the brew funnel and discard the grounds and filter only after visible dripping stops.
41581 120408