


9
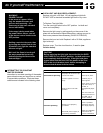
using your new range: griddle, oven sections
NOTE:
The griddle section is only available on model #
PSGR364G, PSGR486G, PSGR486BG
DESCRIPTION:
The built in griddle is made of restaurant quality 3/8” thick
stainless steel. This produces a surface with even heat
that is easy to clean.
The griddle has a stainless steel straight tube
burner that is lit by a spark igniter. The griddle should
light with 5 clicks of the igniter. This eliminates the
need for a continuous burning pilot light.
The burner is rated at 18,000 BTU/HR.
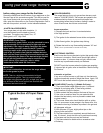
Control Knob:
The griddle is electronically controlled with temperatures
marked on the knob from 150 deg. F to 500 deg. F.
• There are no fixed settings on the knob.
• Press and turn the knob counter-clockwise to the
temperature setting.
PRIOR TO USE:
Preparing the Griddle:
The griddle must be level or tilted slightly forward for
optimum performance. The griddle should have been
leveled during installation
It is NECESSARY to wash the griddle plate with warm
soapy water then rinsed with clear water. The griddle
may be used without butter, margarine, or oil. However,
a very small amount may be used to flavor foods.
Cooking on the Griddle
• Check that the grease tray is tucked under the
griddle plate overhang.
• Turn the knob to the cooking temperature to
preheat the griddle.
• Preheat 5-10 Minutes.
• Add butter, margarine, shortening or oil for more
flavor: Add food and cook!
CAUTION!
Aluminum foil should never be used to cover the
oven racks or line the oven. It may cause damage
to the oven if it touches the infrared broiler or
when heat is trapped beneath it.
PRECAUTION!
Remove all packaging and temporary labels from
oven and range.
OVEN RACKS:
THE PSGR Models each come with 3 racks in
the main oven (on the PSGR48 inch models, we
supply 3 racks in the main oven and two racks in
the smaller oven).
1) The correct rack position depends on the recipe and
the cooking mode. The rack positions are numbered
from the bottom of the oven to the top, like an elevator.
2) Rack position 2 is the most frequently used
position. Place rack(s) in the proper position before
turning on the oven. For all models insert and
remove racks as follows:
• Hold the rack with the back rail in the up
position towards the rear of the oven. Slip it
into the oven so the rack slides are between
the rack and the rack guides.
• Tip the front of the rack slightly as it slides
into the oven, so that the safety stops clear the
rack slides. The safety stops one the back of
the rack will keep it from sliding out of the
oven when it is pulled forward.
griddle section
oven section