


Please note: If you use frozen beans, let them thaw for 3 to 4 hours before
adding to the bean container. This will prevent moisture from seeping into the
grinder. Never use sugar-coated beans. The sugars will stick to the burrs and
clog the flow of ground coffee. Have your local coffe emporium grind the sugar
coated beans for you and use as described in chapter 8.1.
7.2a Using Oily Beans
Beans with an oily surface tend to stick together. This may prevent a continuous
flow of beans from the bean container into the burrs. As a result the grinder
does not grind enough coffee and you might get weak or no coffee at all. Stir
the beans in the bean container just before grinding. Alternatively you can also
pour the beans in an open bowl and let them sit for about 5 hours. The oils will
evaporate (this will not change the taste of your coffee). Then fill the beans into
the bean grinder. Now beans will feed into the burrs more easily.
7.3 First Time Preparation
This procedure is only necessary before first time use and after "Clearing for
Transport" (chapter 12.4). Make sure the water tank and bean container are filled.
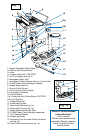
a. Push and hold the On/Off button (fig. 1,10) until the display illuminates. The
display will show: HOT WATER CYCLE / NECESSARY.
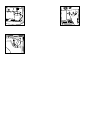
b. Place a cup underneath the steam nozzle (fig. 7) and turn the Steam/Water-
Dial (SW Dial) to the water symbol (fig. 2c). The machine will pump a bit of
water through the hot water nozzle and stop by itself.
c. Turn the SW Dial back to the 0-position (fig. 2a). The display will show
PLEASE WAIT / HEATING UP.
d. When the display shows RINSE MACHINE / PRESS BUTTON move the cup
underneath the coffee spouts and press the BUTTON inside the Coffee Dial.
(fig 1, 10a) Hot water will warm up all internal parts and will be pumped into
the cup. The C1500 will stop and the display will indicate one of the six pos-
sible coffee options, e.g. 1 CUP REGULAR / PRESS BUTTON 3.0. (this
means the machine is ready to brew a 3 oz. cup of coffee, regular strength).
e. Empty the cup, place it back underneath the coffee spout and push the
BUTTON (fig.1, 10a) again. The second line of the display will show BREWING
3.0. The C1500 will start grinding and brewing. Since it is the first time, it will
not complete the cycle. When the display shows again PRESS BUTTON,
repeat step "e" one more time. Discard the coffee.
f. Now the grinder, the grinder channel and the brewing chamber are ready to
brew coffee.
7.4 Daily Preparation
a. We recommend filling the water container every morning with fresh, cold
water. This will enhance the taste of your coffee.
b. Push and hold the On/Off Button (fig.1, 10) until the display illuminates. It will
show PLEASE WAIT / HEATING UP. After a couple of minutes the display will
show RINSE MACHINE / PRESS BUTTON.
c. Press the BUTTON. Hot water will warm up all internal parts and will be
pumped through the coffee spouts. The water will be caught in the tray
underneath. When the rinsing cycle is completed, the display will show the
last coffee setting, e.g. 1 CUP X STRONG / PRESS BUTTON 6.0
The C1500 is now ready to make coffee.
10.