


Operator’s Manual P/N-260APC-A
______________________________________________________________________________
7
OPERATION
Operation of the Cleveland Range Convection Steamer is
very easy. Each operator should read and understand the
following procedures to effectively start, operate, and shut
down the steamer each day. The owner(s) and operator(s)
of this equipment should be aware that live steam could
cause serious injuries, pay particular attention to the
WARNINGS in this text. These instructions are to be
retained by the owner(s)) and operator(s) for future
reference.
Note: These instructions pertain to pressure steamers
equipped with a steam generator (boiler). For
pressure steamers direct-connected to a remote
(in-house) steam source. Disregard those
instructions, which pertain solely to a self-
contained boiler.
START-UP AND PREHEAT
WARNING
Do not attempt to start or operate the Pressure Steamers
during a power failure. Critical safety circuits are not
energized, and serious injury to personnel or damage to
equipment may result.
Boiler Controls
1. Start the steam supply. The steam is either an integral
steam generator boiler) built into the base unit, or an
external steam supply.
• For units without a built-in boiler, refer to the start-up
procedures for the external steam supply and be sure
it is running properly. As soon as the pressure gauge
On the Pressure Steamer front console is a pressure
gauge, when it registers 10 psi, steamer preheating may
begin. Skip the remainder of step I, and begin step 2.
• For units with a built-in boiler, fill the boiler with water
and start the steam generator as described in step a.
through d. below.
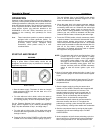
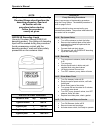
a. Press the ON end of the POWER on-off rocker switch
located next to the steam pressure gauge (Figure 2).
The red indicator light in the POWER rocker switch
turns on and the steam generator begins to fill with
water units takes about 5 minutes.
b. When the water level in the steam generator reaches
a safe operating level, the amber light in the STEAM
momentary switch turns on. Whenever the amber light
is on, the heaters, steam supply, or burners are off,
and no steam is being generated. The energy source
(electric, gas, etc.) cannot be activated until the boiler
contains sufficient water, indicated by the amber light.
c. Press the STEAM (amber colored) momentary switch
to produce steam in the boiler this activates the energy
source (electric heaters, gas burners, or steam so-
lenoid valve) and the amber light turns off. The STEAM
switch must be pressed to restart the steamer after it is
shut off for any reason (including a brief power
interruption). No attempt should be made to operate
the equipment during a power failure.
NOTE: For steamers with built-in gas-fired boilers: If the
burners fail to ignite in four seconds, a safety
circuit energizes the system. In this event toggle
the POWER rocker switch to the OFF position
and back to the ON position. The amber light in
the STEAM momentary switch lights. Wait five
minutes, and then press the STEAM momentary
switch to start the burner ignition cycle once
again.
d. About 15 minutes after starting the boiler in step C; the
steam pressure gauge on the unit base should register
10 psi.
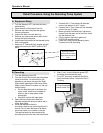
2. To preheat, close and latch the door securely Turn the
bar handle clockwise until the gasket just touches the
compartment face.
3. Start the steam supply by pulling the steam valve
handle out' The handle is located to the immediate left
of the door latch. set the time for 5 minutes. The
standard mechanical timer must be turned past 10
minutes to wind the spring. then set the timer for S
minutes. This is not necessary with the optional
automatic timer. At the start the compartment
thermostatic traps will release air and wet steam for
about two minutes, then shut of. Throughout the
preheating or cooking cycles, the traps will open and
close periodically. venting cooler steam and condensate
4. Seal the compartment door by turning the bar handle
clockwise just until steam leakage stops. DO NOT
OVERTIGHTEN.
5. At the completion of the 5-minute preheating cycle, the
timer's bell will ring. If fitted with an optional automatic
timer; turning the knob to "Or. will stop the bell. Push