


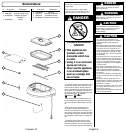
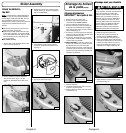
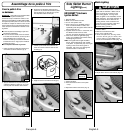
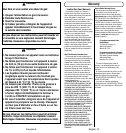

2. Appuyez fermement sur la poêle à frire pour
solidement l’adapter en place (fig.3). Le joint
entre la poêle et le barbecue sera uniforme.
3. Enclenchez les dispositifs de blocage de la
poêle à frire en poussant fermement les pattes
dans les fentes (fig.4).Assurez-vous que les
deux dispositifs soient bien bloqués.
Fixez la poêle à frire
au barbecue
Assemblage de la poêle à frire
REMARQUE: Cette poêle à frire accessoire Side
Solution™ est uniquement étudiée pour
fonctionner lorsque correctement montée sur les
barbecues Coleman® des modèles 9993 et 9998.
Cet appareil peut être placé d’un côté ou de l’autre
du barbecue. Essayer de l’utiliser ou de la monter
d’une manière autre que celle préconisée dans la
notice d’emploi est formellement interdit et annule
la garantie.
■ Sortez les pièces de l’emballage et jetez tous
les éléments d’emballage.
■ À l’eau savonneuse chaude, lavez les surfaces
en contact avec les aliments, soit le corps de la
poêle antiadhésive et le couvercle, puis
asséchez-les.Essuyez les surfaces intérieures
et extérieures avec un linge propre humidifié et
asséchez-les à fond.
■ Est uniquement destinée au grand air.
1. Faites concorder les pattes de la poêle à frire
et les fentes du côté du barbecue (fig.2).
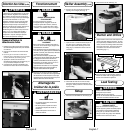
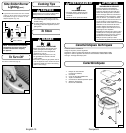
5.
Réglez le bouton de commande à l’arrêt (fig.6).
4. Vérifiez que le robinet de la bonbonne soit
fermé en tournant le robinet à fond en sens
horaire (fig.5).
Fig. 2
Fig. 3
Fig. 4
Fig. 5
Fig. 6
Français-6
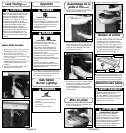
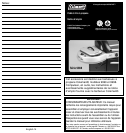
7.
Observe the flame.
8.
Flame should be blue with a hint of yellow
on tips.
English-9
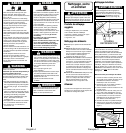
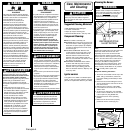
INSTASTART™ Electronic
Ignition Skillet:
1.Remove skillet.
2.Make sure all valves are OFF.
3.Turn on the cylinder valve.
4.Push in and turn on the Skillet Control
Knob counterclockwise to HIGH, then
repeatedly press the igniter switch until the
flame ignites (Fig 14).
5.If ignition does not occur in 5 seconds, turn
the Skillet Control Knob off, wait 5
minutes, and repeat the lighting procedure.
6.If the burner does not light after trying
again, turn off Skillet Control Knob and try
match lighting the burner.
HINT: If the igniter fails to light the skillet
burner, adjust electrode tip with needle-
nose pliers. A spark must jump near a gas
opening in the burner when igniter is
activated. Use care not to damage the
ceramic insulator on electrode.
Fig. 14
Push
Repeatedly
Side Skillet Burner
Lighting
(cont.)
9.
Adjust flame with the control knob (Fig.15).
Match Lighting:
CAUTION
Use a LONG wooden match or a butane
lighter with an extension. Make sure all
burner controls are off except for the
burner being lighted. If a long-reach
match or lighter is not accessible, use the
match extension. The match extension is
located inside the doors.Remove the
cooking surface.Insert a match in the
holder end of the extension, strike and
place the burning match near the
BURNER being operated.
1.Remove skillet.
2.Make sure all valves are OFF.
3.Turn on the cylinder valve.
4. Strike and place the burning match
near the burner gas port holes, then
push in and turn on the Skillet Control
Knob counterclockwise to HIGH (Fig.16).
Fig. 15
Fig. 16
8.Adjust flame with the control knob (Fig. 17).
Fig. 17