FOR BEST RESULTS
- Always preheat the sandwich maker before use. Plug cord into a power outlet while preparing
thellings.
- Forsoftorliquidsandwichllings,usemediumslicedbread.
- Flavored butter or margarine can also be used.
- A teaspoon of sugar sprinkled on the outside of bread slices makes the toasted sandwiches
crispier;especiallyforfruitlledsandwiches.
GRILL
1) Whenusingforthersttime,wipethesurfaceofthecookingplateswithadampclothand
dry.
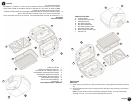
2) Snap the plates onto the unit by using the Panel Tabs (B) and the housing on the sides of
each plate.
3) Besuretoplacetheunitonaat,heat-resistantsurfacewhilecooking.Alsomakesure
you are cooking in a well-ventilated area.
4) Brushalightcoatingofcookingoilontothenon-stickgrillingsurfacebeforerstuse.
5) Close the cover/lid of the grill. Plug the unit into an electrical outlet. The red Preheat light
will turn on.
6) Let the grill preheat for 5 minutes to burn off any excess residue or factory coating.
7) Placefoodontothegrill;makesuretoleavespacebetweeneachpiecetoavoidfood
sticking to each other. Close the cover/lid for grilling.
8) When the thermostat has reached the right temperature, the green Cook light will go on.
9) Whencookingcycleisdone;makesuretheplugisunpluggedfromtheoutlet.Carefully
open the cover/lid (Careful: Cover/lid may get hot.) Gently remove food from grill.
10) NEVER use metal or sharp devices such as forks or knives to remove the food. Always
use wooden or plastic spatulas or utensils to remove.
11) Always make sure the power cord is unplugged from any wall outlet when the unit is not in use.
SAFETY TIPS
• Alwaysmakesuretheplugisunpluggedwhenyouarenotusingthegrill.
• UseprotectiveovenmittsorglovestoopencoverandNEVERtouchthecoverofthegrillwhile
it is in operation.
CARE AND CLEANING
• Unplugtheunitbeforecleaning.Allowtheplatestocooldownbeforeremovingandcleaning
• Wipetheinsideoftheunitwithapapertowel.
• Removeanycookingplatesthatyouareusingandwashwithwarmsoapywater.Setasideto
dry before putting the cooking plates back onto the unit.
• Non-Stickcookingplatesarealsodishwashersafe.
(Remove plates by sliding the Locking Clasps (A) and lifting the plates up.)
• Wipetheexterioroftheunitwithadampcloth.Makesurethatnomoisture,oilorgrease
remains in the cooling slots.
• Donotcleantheinterior/exteriorwithascouringpad,abrasiveorsteelwoolasthiswilldam-
agethenish.
• Donotimmersetheunitinwater.
Nota: Duranteelprocesodetostadoypreparacióndelossándwiches,laluzverdedecoc-
ciónseencenderáyseapagaráperiódicamenteparamantenerlatemperaturaadecuada.
11) El sándwich quedará tostado dentro de 2 a 3 minutos o un tiempo más prolongado según
sus gustos.
12) Abra la tapa del electrodoméstico y retire los sándwiches utilizando una espátula de plásti-
co o de madera.
13) NUNCAutiliceutensiliosdemetaloaladostalescomotenedoresocuchillospararetirar
los alimentos. Utilice siempre espátulas o utensilios de madera o de plástico para retirar los
alimentos.
14) Cierre la tapa del electrodoméstico para mantener el calor hasta que se encuentre listo
para preparar el siguiente sándwich.
15) Desenchufe el electrodoméstico al terminar de usarlo.
PARA MEJORES RESULTADOS
- Siempre precaliente el electrodoméstico antes de utilizarlo. Enchufe el electrodoméstico
mientras se prepara los ingredientes.
- Para rellenos de sándwiches más suaves o con líquidos, utilice pan rebanado de tamaño
mediano.
- También se puede utilizar mantequilla o margarina saborizadas.
- Para que su sándwich sea más crocante, se puede añadir una cucharadita de azúcar espol-
voreada por encima de de las rebanadas de pan, especialmente para sándwiches rellenos
con frutas.
CÓMO ASAR
1) Almomentodeutilizarelelectrodomésticoporprimeravez,frotelassupercieslasplan-
chasdecocciónconunpañohúmedoyluegoprocedaasecar.
2) Coloque las planchas sobre el electrodoméstico utilizando las lengüetas (B) para asegu-
rarlas en cada uno de los lados de la plancha.
3) Asegúresedecolocarelelectrodomésticosobreunasupercieplanayresistentealcalor
durantelacocción.Tambiénasegúresedequeselleveacabolacocciónenunazona
bien ventilada.
4) Embadurnelassuperciesdelasplanchasantiadherentesconaceitedecocinaantesde
utilizar por primera vez.
5) Cierre la tapa del electrodoméstico. Proceda a enchufar el electrodoméstico al tomacor-
riente. La luz roja de precalentamiento se encenderá.
6) Deje que el electrodomésticos se caliente durante unos cinco minutos para quemar cual-
quier exceso de residuos o cubiertas que vengan de fábrica.
7) Coloquelosalimentossobrelaplancha.Asegúresededejarelsucienteespacioentre
cada alimento para evitar que se peguen unos a otros. Cierre la tapa para iniciar el
asado.
8) Cuandoeltermostatohayaalcanzadolatemperaturaadecuada,laluzverdedecocción
se encenderá.
9) Unavezqueelciclodecoccióntermine,asegúresededesenchufarelelectrodoméstico.
Con cuidado abra la tapa (tenga sumo cuidado ya que la tapa podría estar caliente). Con
cuidado retire los alimentos de las planchas.
10) NUNCAutiliceutensiliosdemetaloaladostalescomotenedoresocuchillospararetirar
los alimentos. Utilice siempre espátulas o utensilios de madera o de plástico para retirar
los alimentos.
11) Asegúrese siempre de que el electrodoméstico se encuentre desenchufado si no se va a
utilizar.
4
English
4
Español


