


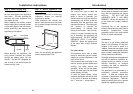


We hope that the following
information will help you to familiarise
yourself with the features of the
appliance, and to use it successfully
and safely.
Our policy is one of constant
development and improvement. Strict
accuracy of illustrations and specifications
is not guaranteed. Modification to
design and materials may be
necessary subsequent to publication.
This appliance must be installed in
accordance with the regulations in
force and only in a well ventilated
space. Read the instructions before
using or installing this appliance.
Your 1st Year Guarantee
To fulfil the conditions of your guarantee,
this appliance must be correctly
installed and operated, in accordance
with these instructions, and only be
used for normal domestic purposes.
Please note that the guarantee, and
Service availability, only apply to the
UK and Republic of Ireland.
Gas & Electrical connection
Please refer to installation instructions
for the Gas & Electrical Safety Regulations
and the Ventilation Requirements.
In your own interest, and that of safety,
it is the law that all gas appliances be
installed by a competent person who
will ensure that the installation is in
accordance with “The Gas Safety
(Installation & Use) Regulations 1994”,
& the “The Gas Safety (Installation &
Use) (Amendment) Regulations 1996”.
Failure to comply with these Regulations
is a criminal offence.
Corgi registered installers undertake to
work to satisfactory standards.
Disconnection of gas and electric
appliances should always be carried
out by competent persons.
Warning: This appliance must be
earthed.
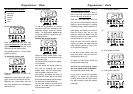
In the event of a power cut
1. Switch off the electricity to the
appliance at the socket.
2. When the power returns, see the
‘Programmer / Clock’ section to
‘Set the time of day’.
The Gas Consumer Council (GCC) is
an independent organisation which
protects the interests of gas users. If
you need advice, you will find the
telephone number in your local
telephone directory under Gas.
2
Introduction
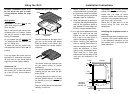
Step 5: Commissioning
Pressure test point
Use the oven burner. From inside the
oven remove the burner cowl. Remove
the small screw at the LHS of the
burner cradle. Slide the burner to the
left to access the injector.
Connect suitable T-piece
(incorporating a 1.25mm injector) to
the injector. Connect manometer to
the T-piece, and turn oven control to
full on to check pressure.
Replace in reverse order.
Burner aeration
All burners have fixed aeration and no
adjustment is possible.
Pressure setting
Cat I
2H G20 Natural Gas @ - 20mbar
Electrical systems check
In the event of an electrical fault the
preliminary electrical system check
(earth continuity, short circuit, polarity
and resistance to earth) must be
carried out.
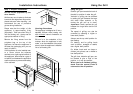
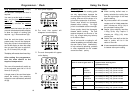
Oven
1. Push in and turn the control knob
anticlockwise to gas mark 9.
2. Adjust to the required setting.
3. The burner may not come on to a
full rate unless the oven door is
closed.
The oven burner operates at a low
rate for up to 60 seconds until the
flame supervision device opens
and full gas rate is obtained.
Grill
1. The door must be open for the grill
burner to ignite.
2. Push in and turn the control knob
clockwise to the grill symbol.
3. Close the door, and check that the
burner goes out.
The grill burner will re-ignite when
the door is opened again.
Before leaving the installation
Show the customer how to ignite
the oven and grill and give them this
handbook. Thank you.
27
Installation Instructions