


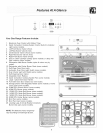

Solutions to Common Problems
Before you carl for service, review the following list. It may save you time & expense. The list includes common occurrences (shown
in bold) that are not the result of defective workmanship or materials in this appliance. The possible corrections to these problems
are provided with the problem listed:
Range is not level - (1) Poor installation. Place oven rack in center
of oven. Place a level on the oven rack. Adjust leveling legs at base
of range until the oven rack is level. (2) Be sure floor is level, strong
& stable enough to adequately support range. (3) If floor is sagging
or sloping, contact a carpenter to correct the situation. (4) Kitchen
cabinet alignment may make range appear not level. Be sure
cabinets are square & have sufficient room for range clearance.
Cannot move appliance easily. Appliance must be accessible
for service - (1) Cabinets not square or are built in too tightly.
Contact builder or installer to make appliance accessible. (2)
Carpet interferes with range. Provide sufficient space so range
can be lifted over carpet.
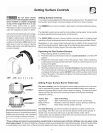
Surface Burners do not liLht - (1) Surface Control knob was
not completely turned to LITE. Push in & turn the Surface
Control knob to LITE until burner ignites and then turn control
knob to desired flame size. (2) Burner ports are clogged. With
the burner OFF, use a small-gauge wire or needle to clean
ports. See "Cleaning the Contoured Welt Areas, Burner Caps,
Head & Drip Pans" in the General Care & Cleaning section for
additional cleaning instructions. (3) Range power cord is
disconnected from outlet (electric ignition models only). Be
sure power cord is securely plugged into the outlet. (4)
Electrical power outage (electric ignition models only). Burners
can be lit manually. See section on Setting Surface Controls.
Surface burner flame burns onlyjoart way around burner cap -
(1) Burner ports are clogged. With the gas burner OFF, clean ports
with a small-gauge wire or needle. (2) Moisture is present after
cleaning. Lightly fan the flame & allow burner to operate until flame
is full. Dry the burners thoroughly following the instructions under
"Cleaning the Contoured Well Areas, Burner Caps, Head & Drip
Pans" in the General Care & Cleaning section.
Surface burner flame is orang#_ - (1) Dust particles in main line.
Allow the burner to operate a few minutes until flame turns blue.
(2) In coastal areas, a slightly orange flame is unavoidable due to
salt air.
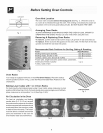
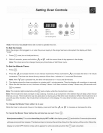
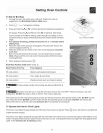
Oven does not operate - (1) Be sure the oven controls are set
properly for the desired function. See Setting Oven Controls in this
Use & Care Manual or read the instructions "Entire appliance
does not operate" in this checklist. (2) Be sure gas regulator valve
is "ON". See installation instructions.
Entire appliance does not operate - (1) The time of day is not set.
The time of day must first be set in order to operate the oven. See
"To Set the Clock" in the Setting Oven Controls section.(2) Make
sure cord/plug is plugged correctly into outlet. (3) Service wiring is
not complete. Contact your authorized service agent. (4) Electrical
power outage. Check house lights to be sure. Call your local
electric company for service. (5) Be sure gas supply is turned ON.
Oven control beeps & displays any F code error (for example
Fll) - Electronic control has detected a fault condition. Press
CLEAR/OFF to clear the display & stop beeping. Reprogram oven.
Iffault recurs, record fault number. Press CLEAR/OFF & contact an
authorized service agent.
Poor baking results - Many factors affect baking results. Make sure
the proper oven rack position is used. Center food in the oven &
space pans to allow air to circulate. Allow the oven to preheat to the
set temperature before placing food in the oven. Try adjusting the
recipe's recommended temperature or baking time. If you feet the
oven is too hot or cool, see Adjusting Your Oven Temperature in
this Use & Care Manual.
Oven smokes excessively during broiling - (1) Control(s) not set
properly. Follow Broil instructions under Setting Oven Controls. (2)
Oven door is open. Make sure oven door is closed. (3) Meat too
close to the broil element. Reposition the broil rack to provide
proper clearance between the meat & the element. Preheat the
broil element for searing. (4) Meat not properly prepared. Remove
excess fat from meat. Cut fatty edges to prevent curling, but do not
cut into lean. (5) Insert on broiler pan wrong side up & grease not
draining. Always place grid on the broiler pan with ribs up & slots
down to allow grease to drip into pan (some models). (6) Grease
has built up on oven surfaces or broiler pan & insert (some
models). Regular cleaning is necessary when broiling frequently.
Old grease or food spatters cause excessive smoking.
Self-Cleaningc3fcle does not work - (1) Oven control not set
properly. Follow instructions under Self=Cleaning. (2) Self-Cleaning
cycle was interrupted. Follow steps under "Stopping or Interrupting
a Self-Cleaning Cycle" under Self-Cleaning.
Soil not completely removed after Self-Cleaning_vcle - Failure
to clean bottom, front top of oven, frame of oven or door area outside
oven seal, These areas are not in the Self-Cleaning area, but get
hot enough to burn on residue, Clean these areas before the Self-
Cleaning cycle is started, Burned-on residue can be cleaned with
a stiff nylon brush and water or a nylon scrubber, Be careful not to
damage the oven gasket,
Flames inside oven or smoking from oven vent - Excessive
spitlovers in oven. For example this will happen for pie spitlovers
or large amounts of grease left on the oven bottom. Wipe up
excessive spittovers before starting oven. If flames or excessive
smoke are present see "Broiling" in the Setting Oven Controls
section.
Oven light does not work (some models) - Replace or tighten
bulb. See Changing Oven Light section in this Use & Care Manual.
19