


3
to pierce eggs to prevent the shells from
cracking while cooking.
NOTE: PIERCING PIN IS EXTREMELY
SHARP – USE CAUTION WHEN
REMOVING PROTECTIVE COVER.
11.
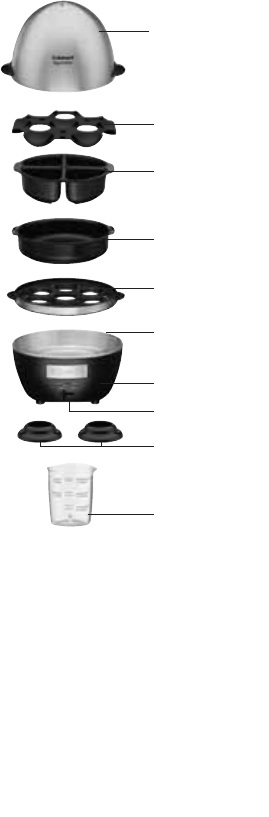
BPA Free (not shown): All materials that
come in contact with food are BPA free.
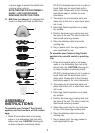
ASSEMBLY
INSTRUCTIONS
To assemble your Cuisinart
®
Egg Central
appliance for hard, medium, or soft cooked
eggs:
1. Rinse all removable parts in hot soapy
water or in a dishwasher (top rack only)
before each use. CAUTION: Piercing pin
on base of beaker is extremely sharp.
DO NOT submerge base of unit in water or
liquid. Base can be wiped clean with a
damp cloth. Please refer to the Cleaning
Instructions page 6, section for more
information.
2. Thoroughly dry all removable parts and
place next to the unit, or store them when
not in use.
3. Place Egg Central appliance on a clean,
dry surface.
4. Position the lower egg cooking rack over
the base of the unit. The ribs on side han-
dles should be facing upward.
5. Place the stainless steel lid over the
cooking tray.
6. Plug in power cord. Your egg cooker is
now assembled for use.
To assemble your Cuisinart
®
Egg Central
appliance for use with omelet or poaching
tray:
1. Rinse all removable parts in hot soapy
water or in a dishwasher (top rack only)
before each use. CAUTION: Piercing pin
on base of beaker is extremely sharp.
DO NOT submerge base of unit in water or
liquid. Base can be wiped clean with a
damp cloth. Please refer to the Cleaning
Instructions page 6, for more information.
2. Thoroughly dry all removable parts and
place next to the unit, or store them when
not in use.
3. Place Egg Central appliance on a clean,
dry surface.
4. Position the lower egg cooking rack over
the base of the unit. The ribs on side han-
dles should be facing upward.
5. Select the proper tray for use, and place
on top of the lower egg cooking rack.
6. Place the stainless steel lid over the
cooking tray.
7. Plug in power cord. Your egg cooker is
now assembled for use.
1
3
4
5
2
6
7
8
9
10