


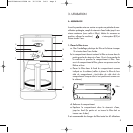
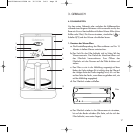

2. Fill the water reservoir
Fill the reservoir with cold water depending on the desired
number of cups (see height markings inside the reservoir).
Note: the coffee pot height markings represent the number
of cups obtained. The difference between this scale
and the water reservoir marks results from the
amount of water lost in wetting the grounds.
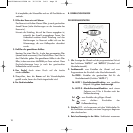
3. Add the ground coffee
Open the lid. Insert a #4 paper filter or the permanent
filter (never both of them at the same time) in the filter
holder. Add the desired amount of ground coffee in the
filter. Use one measuring scoop per cup. This average dose
can be adjusted to suit your taste.
4. Flip the lid close. Push firmly on top.
5. Make sure the coffee pot is in its position on the heating plate
before switching the coffeemaker on.
6. Turn the coffeemaker on.
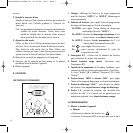
B. OPERATING THE APPLIANCE
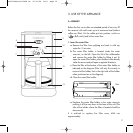
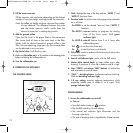
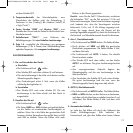
THE CONTROL PANEL
1. Clock: displays the time of the day and the “AUTO 1” and
“AUTO 0” functions times.
2. Function knob: to set the time and program the automatic
on or off time.
2a. PROG: to set the desired “auto on” time (“AUTO 1”
function).
2b. AUTO 1: auto-on feature to program the starting
time of the brew cycle. With green
indicator light.
2c. AUTO 0: auto-off feature from 0 to 4 hours after
coffeemaking start.
2d. : to set the time of the day.
2e. : to start the brew cycle directly.
3. O/I switch: works in tandem with the function knob to start
or stop a function.
4. Central red indicator light: works with the O/I switch
5. Heater plate control knob: to keep coffee warm after
brewing. 3 positions: L = low, M = medium and H = high.
6. Hour (“HRES”) and minute (“MIN”) buttons: to set the time
and automatic on and off times.
7. “CALC.” : descaling button: to eliminate calcium build-up.
With red descaling indicator light.
8. 1-4 cup setting: ensures optimum temperature whilst
preparing smaller pots of coffee (1 to 4 cups). With
orange indicator light.
PROGRAMMING
1. To turn the coffeemaker on and off
a. Turn on
• Turn the function knob on position.
• Flip the O/I switch up (I) and release.
• The central red indicator light illuminates and the
brewing cycle starts.
• The end of brewing cycle is signalled by 5 beep sounds.
1
2a
2b
2c
2d
2e
3
4
5
6
78
12
DCC1200WE-DCC1200E IB 30/11/04 9:49 Page 13