


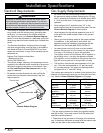


8
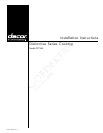
Installation Instructions
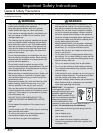
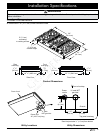
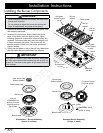
SimmerSear™ Burner Assembly
(center of cooktop)
Standard Burner Assembly
(2 large, 2 small)
Igniter
Burner cap
(bottom shown)
Inner burner cap
(bottom shown)
Outer burner cap
Burner ring
Burner ring
Burner base
Burner base
Line up
indentations on
bottom of burner
ring with pins on
top of base.
Installing the Burner Components
WARNING
• Never attempt to operate the cooktop with any of the
burner parts removed.
• Do not attempt to adjust the burner air mixture set-
tings. All adjustments are preset at the factory.
1. Remove the burner rings, burner caps and grates from
their shipping packages.
2. Assemble the burners as shown. Match the burner
parts to the correct size and type of burner. When
installing the burner components, make sure they are
centered. Twist each piece back and forth slightly until
it drops completely into place. The burners will not
operate properly unless all of the burner pieces are
properly seated.
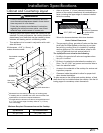
3. Gently set the grates on top of the spill tray. Make sure
that the rubber feet are positioned in the dimples.
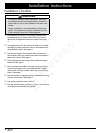
IMPORTANT
Each grate is different. Orient them as shown. Each grate
has a slot on the bottom that matches up with a notch on
the spill try. The slots on the grates all go toward the back
of the cooktop.
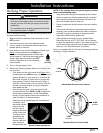
Fit hole in burner
ring over igniter
CAUTION: Top of
igniter is sharp
SimmerSear™
burner
Standard
burner
Slot on
bottom
Slot on
bottom
Slot on
bottom
Left grate,
curved fingers
on left
Center grate
Right grate,
curved fingers
on right
Notch