


15
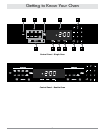
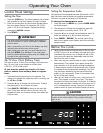
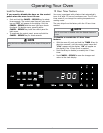
Operating Your Oven
Timers
warning
The timers on your oven do not turn the oven on or off.
They are only for timing purposes. When you want to turn
the oven off automatically, use the Delay Timed Cooking
Features.
important
Pressing the
CANCEL · SECURE
key does NOT reset or
stop the timers.
Your oven is equipped with two built-in timers.•
You can use both of them at the same time.•
You can time from 1 minute up to 99 hours and 59 min-•
utes.
The timer symbol appears on the display when •
one or both of the timers is in use.
To use the timers on your oven:
Press the 1. TIMER 1 or TIMER 2 key.
Enter the hours and minutes to be timed on the keypad 2.
and press START. To enter 11 hours, 30 minutes, press
1-1-3-0. To time 25 minutes, press 2-5. When you press
START, the time will appear on the display and begin to
count down.
When the timer is done counting down, 0:00 will appear
on the display. The timer number will ash on the display
and the alarm (a beeping sound) will sound. The alarms
for Timer 1 and Timer 2 have different patterns.
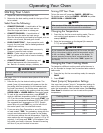
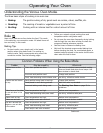
Timer Alarm Pattern
1 1 second on, 1 second off, repeat
2
1 second on, 1 second off, 2 seconds on
1 second off, repeat
When the alarm sounds, press either TIMER key to stop
the alarm. Press
CLOCK to return to the main display.
While a timer is running you can:
Press • CLOCK to view the current time.
Press • TIMER 1 to view the time left on (or set) timer 1.
Press • TIMER 2 to view the time left on (or set) timer 2.
To change the amount of time on a timer:
Press the 1. TIMER 1 or TIMER 2 key.
Enter the new time on the number keypad and press 2.
START.
To stop a timer before time runs out:
Press the • TIMER 1 or TIMER 2 key twice. The timer will
stop and the display will clear.
Press • CLOCK to return to the main display.
Delay Timed Cooking Features
If you want to set the oven to automatically turn itself on
or off at a later time, you can use the delay timed fea-
tures.
warning
Food safety is an important consideration when using the
delay timed features. To avoid potential sickness and the
spoiling of food, take the following steps:
Avoid using foods that will spoil while waiting for the •
oven to start cooking. Typical foods to avoid include:
those containing eggs and dairy products, cream soups
and cooked or uncooked meats, poultry and fish.
Do not allow foods to remain in the oven after it turns •
completely off. When the temperature drops below
140°F, bacteria can develop (after hold mode).
If cooking will not begin immediately, place only very •
cold or frozen food into the oven. Most unfrozen foods
should never stand in the oven for more than two hours
before cooking begins.
Things to Know About Delay Timed
Cooking
The delay timed options work for all of the various cook-•
ing modes, except broil and convection broil.
You may use the timers while using the delay timed •
features. The timers do not have an effect on any of the
delay timed cooking options.
The delay timed cycle can be canceled at any time by •
pushing CANCEL · SECURE.
The three delay timed cooking keys are:
START TIME• : The time the oven starts cooking
DURATION• : The amount of time the oven cooks before it
goes into hold mode.
STOP TIME• : The clock time the oven turns off and goes
into hold mode.
When you set 2 of the 3 above, the oven automatically
calculates the third.
The Three Ways to Use Delay Timed
Cooking
Set the time the oven turns on (1. START TIME) and
set it to turn off at a later time using either the
DURATION key or the STOP TIME key.
Set the 2. START TIME only, then turn the oven off
manually when you are done cooking.
Turn the oven on manually and set it to turn off at a 3.
later time using either the DURATION key or the
STOP TIME key.
1 2