


16
Operating Your Oven
About Hold Mode...
When you set the oven to stop cooking using the •
DURATION or STOP TIME keys, it will go into
“hold” mode (HLd appears on the display) when it
reaches the end of the cook time you have set. The
oven will keep the temperature at 150°F for two
hours.
Press • CANCEL · SECURE to turn the oven all the way
off.
To prevent sickness, do not allow foods to remain in •
the oven after it is off (after hold mode turns off).
Using Delay Timed Cooking
note
Delay-timed cooking cannot be used in Sabbath mode.
Adjust the racks to the appropriate level.1.
Put the food in the oven.2.
Press the key for the desired cooking mode (except 3.
broil or convection broil.)
Enter the desired cooking temperature on the number 4.
keypad.
If you want to turn the oven on immediately and turn 5.
off automatically at a later time, skip to step 8.
Press the 6. START TIME key.
Enter the time you want the oven to start on the 7.
keypad. For 12:35, press 1-2-3-5. You may enter
a time up to 22 hours and 59 minutes ahead of the
present time. Press the # key to change “AM” or
“PM.”
If you want to set the stop time or cooking duration, 8.
press either the STOP TIME or DURATION key
(otherwise skip to step 9.) Using the DURATION key
allows you to determine when the oven will stop cook-
ing by entering the amount of time the oven is on.
Using the STOP TIME key allows you to determine
when the oven will stop cooking by entering the clock
time. Using either key achieves the same result.
Press 9. START.
If you entered a 10. START TIME, the oven will start at
the start time entered.
If you entered a 11. DURATION or STOP TIME the oven
will cook until the time entered and then, go into hold
mode.
important
The time required to preheat the oven must be included
in the amount of cook time. For cooking temperatures
of 350°F and below, add 20 minutes to the cook time.
Increase the cook time as the temperature increases above
350°F.
Other Things to Know About Delayed
Timed Cooking
When the oven is in delay timed mode...
Push the • CLOCK key to view the clock (current time).
Push the • START TIME key to view the current start
time setting.
Push the • STOP TIME key to view the current cook
time setting.
Push the • DURATION key to view the current cook
time setting.
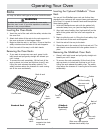
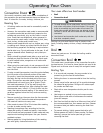
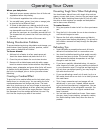
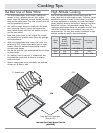
Using the Meat Probe
When you cook foods like roasts and poultry, the internal
temperature is the best way to tell when the food is prop-
erly cooked. Your oven’s meat probe is an easy way to
take the guesswork out of roasting. You can use it to cook
food to the exact temperature you desire. The probe can
be set from 100°F to 200°F.
warning
To avoid the possibility of burns, use hot pads to handle, •
connect, and unplug the meat probe when the oven is
hot.
Use the handles to insert and remove the meat probe’s •
skewer and to connect it to the oven. Pushing or pulling
on either end of the cable could damage the meat
probe. To avoid breaking the meat probe, make sure the
food is completely defrosted before inserting the skewer.
To prevent damage, never leave the meat probe inside •
the oven when it is not being used, especially when
broiling or during the self clean cycle.
Using a meat probe other than the one provided with •
your oven may result in damage to the probe and/or the
oven.
note
The meat probe does not work with broil or convection •
broil and Sabbath modes. Plug in the meat probe when
using the above modes, the meat probe symbol will
flash indicating an error.
If the meat probe is accidently disconnected after the •
PROBE key is pressed, the meat probe symbol will flash
and the error message “OPn” will appear on the display.
For double ovens, the meat probe can only be used in •
the upper oven.
Skewer
Plug