


4
5
Important Safety Instructions
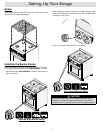
Getting to Know Your Range
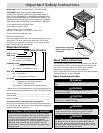
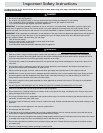
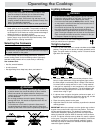
CAUTION
Do not allow acids (citrus juices, tomato sauces, etc.) to remain on the range’s surfaces. The porcelain finish may stain.
Never use the cooktop surface as a cutting board.
Do not try to remove heavy spills with a sharp object such as a knife or metal spatula. Sharp objects may scratch the range’s
surfaces.
To prevent damage, remove the meat probe from the oven when it is not being used.
Do not line the oven with aluminum foil or other materials. These items can melt or burn up during self-cleaning and cause
permanent damage to the oven.
Do not leave metal objects, such as aluminum foil, the meat probe, cookie sheets, etc. on the bottom of the oven. Objects left
on the bottom of the oven could damage the bake element. In addition, the objects themselves may be damaged.
On some ovens, the bake and broil elements are behind glass panels on the floor and ceiling of the oven chamber. Do not allow
these glass panels to become covered up by cookie sheets, aluminum foil, pots, pans, etc. Covering them could cause the
heating elements to over-heat, damaging the oven.
Do not expose the knobs or trim rings to direct flame, hot utensils or other sources of heat.
Always ensure that the light fixture lens covers are in place when using the oven. The lens covers protect the light bulbs from
breakage caused by high oven temperatures or mechanical shock.
1.
2.
3.
4.
5.
6.
7.
8.
9.
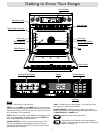
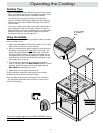
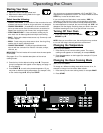
Parts of the Oven
CONTROL PANEL: Your oven’s control panel consists of a touch
pad and a display. Use the control panel to operate all the oven’s
features (sometimes called modes.)
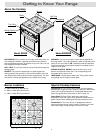
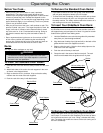
OVEN RACKS: Each oven
comes with chrome-plated
adjustable oven racks. See the
table for the number and type
provided with your model. Page
12 describes the difference
between rack types.
RACK SUPPORTS: There are five rack positions inside each
oven chamber. The rack positions are numbered from the bottom
counting up.
MEAT PROBE CONNECTOR: When you use the meat probe,
insert the skewer into the meat and plug the other end into the
connector. See the Meat Probe section on pages 19 - 20 for
proper operation.
OVEN LIGHTS: There are two oven lights inside the oven
chamber so that you can easily see inside. You can use the lights
when the door is open or to see inside through the window when
the door is closed. The lights turn on or off only when you press
the light key on the control panel. The bulbs are 12 Vac, 20 Watt,
halogen.
DOOR GASKET: The door gasket prevents heat from escaping
when the door is closed.
SELF-CLEAN LATCH: The self-clean latch automatically locks
the oven door during the self-clean cycle. The door latches for
your safety. There are very high temperatures inside the oven
during the self-clean cycle.
BAKE ELEMENT: The source of bottom heat, attached to the
floor of the oven. The bake element is hidden below the glass
panel on the floor of the oven chamber.
BROIL ELEMENT: The source of top heat, attached to the oven’s
ceiling. The broil element is hidden above the glass panel on the
ceiling of the oven chamber.
CONVECTION FAN: The convection fan blows heated air into
the oven chamber during the convection cooking process. The
convection filter covers it.
CONVECTION ELEMENT: The convection element heats the air
that is blown into the oven chamber by the convection fan during
the convection cooking process. The convection filter covers it.
CONVECTION FILTER: The convection filter covers the
convection fan. It helps prevent the transfer of taste from one food
to another when you are cooking a whole meal. It also keeps the
oven cleaner, especially when convection roasting or convection
broiling. In addition, it covers the moving convection fan blades for
safety purposes.
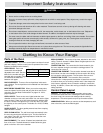
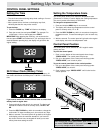
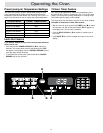
Control Panel Layout
DISPLAY: The control panel display provides various types
of information about the oven, including the current time (once
the clock is set), the current cook settings and the cooking
temperature. The control panel can pivot up for easier access.
NUMBER KEYPAD: When you want to set the temperature, cook
time or the time, use the number keypad.
Rack Type Quantity
Standard 2
GlideRack™ 1