


5
Anti-tip Block
NORMAL INSTALLATION STEPS
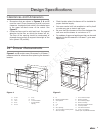
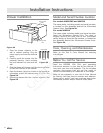
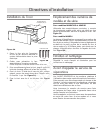
ANTI-TIP BLOCK INSTALLATION INSTRUCTIONS
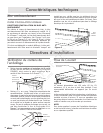
To reduce the risk of tipping of the drawer, the Anti-Tip
block must be properly installed located 14 ³₄" above
theooronwhichtheMicrowaveIn-A-Drawer™willsit.
The 6" Anti-Tip block must be provided by the installer.
See Figures 2 and 6 for (24") or Figures 4, 5, and 6
(for 30"). The Anti-Tip block prevents serious injury that
might result from spilled hot liquids.
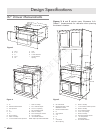
If the drawer is ever moved to a different location, the
Anti-Tip block must also be moved and installed. When
installed to the wall, make sure that the screws completely
penetrate the dry wall and are secured in wood or metal
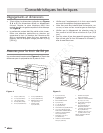
Design Specifications
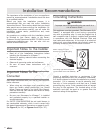
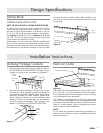
Verifying Package Contents
Remove all packing materials from inside the drawer. •
DO NOT REMOVE THE WAVEGUIDE COVER, which is
locatedonthetopoftheMicrowaveIn-A-Drawer™.
Waveguide
Cover
Sealing
Surface
Remove the feature sticker, if there is one. Check •
the drawer for any damage, such as misaligned or
bent drawer, damaged drawer seals and sealing
surfaces, broken or loose drawer guides and
dents inside the cavity or on the front side of the
drawer. If there is any damage, do not operate
theMicrowaveIn-A-Drawer™andcontactyour
dealer or a DACOR AUTHORIZED SERVICER.
Sealing
Surface
Oven
Cavity
Figure 7
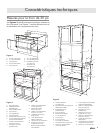
Electrical Outlet
4"
5"
electrical outlet location
2x4 Anti-
Tip block
(6")
Figure 8
The electrical requirements are a 120 volt 60 Hz, AC
only, 15 amp. or more protected electrical supply.
It is recommended that a separate circuit serving
only this appliance be provided.
The drawer is equipped with a 3-prong grounding
plug. It must be plugged into a wall receptacle that
is properly installed and grounded. Should you only
havea2-prongoutlet,haveaqualiedelectrician
install a correct wall receptacle.
NOTE:
If you have any questions about the grounding or
electricalinstructions,consultaqualiedelectrician
or service person.
so that the block is totally stable. When fastening, be
sure that the screws do not penetrate electrical wiring
or plumbing.
4"
5"
electrical outlet location
Anti-Tip
block
(6")
Figure 6
Installation Instructions