


6
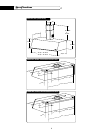
I ns tallation I nstructions
TOOLS NEEDED FOR INSTALLATION PARTS SUPPLIED FOR INSTALLATION
• Saber Saw or Jig Saw • 1 Hardware Package
• Drill • 1 Literature Package
• 1 1/4 Wood Drill Bit
• Pliers
PARTS NEEDED FOR INSTALLATION
• Phillips Screwdriver • 2 Conduit Connectors
• Flat Blade Screwdriver • Power Supply Cable
• Wire Stripper or Utility Knife • 1 Wall or Roof Cap
• Metal Snips • All Metal Ductwork
• Measuring Tape or Ruler
• Level
• Pencil
• Caulking Gun
• Duct Tape
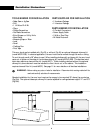
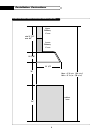
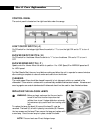
This euro hood can be installed with (Fig. 03) or without (Fig. 04) an optional telescopic chimney kit
(model #ECD-2SS). In a ducted application, this euro hood can be vented through the wall or ceiling.
To vent through a wall, a 90
0
elbow is used. When installing ductless with a chimney kit, the euro hood
vents out of grates on the sides of the ductless chimney kit (model #ECND-2SS). This ductless instal-
lation also requires a charcoal filter kit (model #ECF). When installing ductless without the optional
chimney kit, some ductwork must be installed to divert the air out of the cabinet. This installation
requires charcoal filter kit (model #ECF). See page 11 for more details on all ductless installations.
WARNING: Before making any cuts or holes for installation. Determine which venting method will be
used and carefully calculate all measurements.
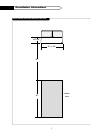
Standard installation for the euro hood requires the canopy to be mounted 30” above the countertop
(Fig. 05a). The optional telescopic chimney kit can be adjusted for ceilings between eight 8’ 2” and 9’ 8”
(Fig 05b).
FIG.03 EURO HOOD WITH OPTIONAL CHIMNEY
FIG.04 EURO HOOD WITHOUT OPTIONAL CHIMNEY