Safe Chill™ Blast Chillers Service & Installation Manual
5
For customer service, call (800) 733-8829, (800) 733-8821, Fax (989) 773-3210, www.deleld.com
5. Start cycle with one unit running (DBC-10 only):
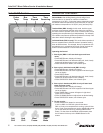
• Press MODE button, display will change.
• Press MODE button until desired mode (soft, hard, freeze)
appears in left hand upper corner of display.
Press START/STOP button, unit will start cycle.
6. Adjusting parameters (using this function will affect
performance and should only be carried out by qualied
personnel.):
• Press and hold UP and MODE buttons until menu changes
to system menu.
• Press UP/DOWN button until “Preset Menu” is highlighted.
• Press UP/DOWN button until parameter to be adjusted is
shown.
To edit press ENTER button
Press UP/DOWN button until new setting is displayed.
Press ENTER to save.
• Press START/STOP to back out to previous menu.
7. Setting Clock.
Skip rst three steps if clock is being set from power startup
• Press and hold UP and MODE buttons until menu changes
to system menu.
• Press UP/DOWN button until “Clock setup” is highlighted.
• Press ENTER button to access Clock setup.
• Press UP/DOWN button until value to be adjusted is
highlighted.
• Press ENTER button to edit setting.
• Press UP/DOWN button until new setting is displayed.
• Press ENTER button to save setting.
• Repeat if additional settings require adjustment.
8. Printing
Print parameter (PR1) must be set to OFF (default) for unit
to print after cycle is complete. If PR1 is set to ON unit will
download information at the print intervals (PT1).
Information is downloaded to printer using the RS-232 port
under the touch pad. If information is to be downloaded to a
PC a crossed RS-232 cable must be used.
Unit will only print to an 80 character wide printer.
• The following instructions are for printing after cycle is
complete (PR1 set to OFF).
• For DBC-5 and DBC-5U press the PRINT button and unit
will begin downloading information. Print function will only
work if the selected units cycle is completed.
• Control only saves information from previous cycle; once a
new cycle is started the previous information is deleted.
OPERATION CONTINUED...
9. Alarms and Faults
The unit will sound an alarm upon the completion of a cycle
or if a fault occurs. The end of a cycle alarm is distinctively
different than the fault alarm. If a fault occurs an alarm will
sound and the display will prompt you to press the ENTER
button. The display will then show an explanation of the fault
that occurred. To end the fault message press START/STOP
button. This will repeat if there is more than one fault.
If the cycle that the fault occurred in is printed the print out
will place an “x” at the right hand side of the printout under
the letter that corresponds to that fault. See the list below for
the fault and its equivalent letter.
A .........Product Probe #1 open
B .........Product Probe #1 shorted
C .........Product Probe #2 open
D .........Product Probe #2 shorted
E .........Box temperature sensor open
F ......... Box temperature sensor shorted
G ......... Defrost temperature sensor open
H .........Defrost temperature sensor shorted
I ......... Chill cycle time exceeded
J ......... Food temperature below limit
K .........Power interrupted cycle


