


Please read this instructions manual carefully
before installing and using the appliance. Only
by following these directions will you be able to
obtain the best results from the appliance and in
complete safety.
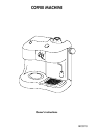
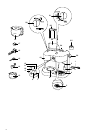
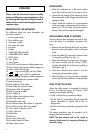
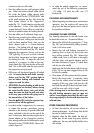
DESCRIPTION OF THE APPLIANCE
The following terms are used throughout the
instructions manual.
1. Power supply cable
2. Drip collection pan
3. Anti spray nozzle
4. Hot water drip spout
5. Hot plate
6 Display
7 Coffee ON DRIP pilot light
8 Coffee DRIP/AUTO button
9 PROG button
10 ‘Min’ button
11 ‘Hour’ button
12.ON/OFF switch espresso coffee/cappuccino
13.ON warning light espresso coffee/cappuccino
14.Steam ready warning light
15. cups warning light for drip coffee
16. cups switch for coffee drip
17.Small coffee pot for espresso coffee/cappuccino
18.Two cup attachment for espresso coffee
19.Measuring spoon
20.Filter holder for drip coffee
21.Filter holder for espresso coffee
22.Permanent filter (if supplied)
23.Filter for espresso coffee
24.Drip coffee pot
25.Drip coffee aroma selector switch
26.Lid for the water tank
27.Removable water tank
28.Anti-chlorine water filter holder (if supplied)
29.Anti-chlorine water filter (if supplied)
30.“Vario system” selector switch
31.Lid for milk tank
32.Milk frother
33.Milk tank
34.Hot water heater plug
35.Hot water heater for steam
36.Steam release knob
INSTALLATION
• Place the appliance on a flat work surface
away from water sources such as taps or sinks.
• Check that the voltage of the electrical power
line corresponds to the voltage indicated on the
appliance label.
• Never install the machine in an environment
which can reach a temperature of less than or
equal to 0°C (if the water inside the machine
freezes, the machine might be damaged):
ANTI-CHLORINE FILTER (IF SUPPLIED)
The anti-chlorine filter eliminates the taste of chlo-
rine in the water. For installation, proceed as fol-
lows:
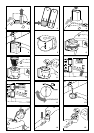
• Remove the anti-chlorine filter from the plastic
bag and rinse it thoroughly under running tap
water.
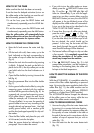
• Raise the coffee lid, remove the container from
its housing by pulling it up (Fig. 1).
• Open the container by pressing on the oppo-
site areas, marked with the writing “PUSH”
and place the filter into its housing carefully as
illustrated in fig. 2.
• Close the container and reinsert it into the
housing by pressing down gently.
• After 80 cycles, or in any case after six months
of use, the anti-chlorine filter must be replaced.
HOW TO SET THE CLOCK
When the coffee maker is connected for the first
time to the electrical mains, the figures 12:00
appear on the display, blinking.
In order to set the time, proceed as follows:
1.Set the hour by repeatedly pressing the HOUR
button. Remember to choose AM or PM, as
appropriate.
2.Set the minutes by repeatedly pressing the MIN
button.
The above operations may be speeded up by
keeping the buttons pressed.
NOTE: The time entered will not be stored in
memory in the event of a temporary blackout of
electrical energy.
6
ENGLISH
10 5
10