


7
HOW TO SET THE TIMER
Make sure that the clock has been set correctly.
To set the timer for delayed activation (to turn on
the coffee maker at the time that you want the cof-
fee to be made), proceed as follows:
1.To set the hour, press the PROG button and
simultaneously repeatedly press the HOUR but-
ton.
2.To set the minutes, press the PROG button and
simultaneously repeatedly press the MIN button.
Note: the coffee maker will automatically begin
making coffee at the set hour, but will not turn on
the hot water generator for espresso coffee.
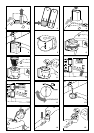
HOW TO PREPARE THE COFFEE FILTER
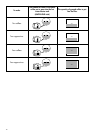
• Raise the lid and remove the water tank (fig.
3).
• Fill the tank with cold, clean water, up to the
level indicated on the tank corresponding to
the number of cups of coffee that are desired
(fig. 4).
• Reinsert the tank into the machine by pressing
it slightly. If desired, the tank can be left in its
place and to fill it, the drip coffee pot can be
used which also has the level indicators on it
(fig. 5).
• Open the filter holder by turning it towards the
left (fig. 6).
• Place the permanent filter into the filter holder
(fig. 7).
• Put the ground coffee into the filter by using the
measuring spoon included with the machine
and level off the grounds uniformly (fig. 8). As
a general rule, use one level measuring spoon-
ful of coffee (about 7 grams) for each cup of
coffee (for example, use 10 measures to make
10 cups of coffee). In any case, the quantity of
ground coffee to use can vary according to the
strength desired and personal taste. Use high
quality ground coffee, with a medium grind
and the kind packaged especially for drip cof-
fee makers.
• Close the filter holder and place the pot, with
its lid inserted, onto the hot plate.
• Select the aroma desired as indicated in the
paragraph “How to select the aroma”.
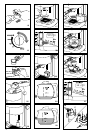
• If you wish to turn the coffee maker on imme-
diately, press the DRIP/AUTO button twice
(fig. 9) and the ON DRIP pilot light will
come on. Alternatively, if you wish the appli-
ance to turn on after a certain delay, press the
DRIP/AUTO button just once; the word PROG
will appear in the top left-hand corner of the
display and the coffee maker will automatical-
ly turn on at the time set (as described in the
“HOW TO SET THE TIMER” section).
• If more than five cups of coffee are desired,
press the switch ( ) (fig. 10)
and the 5/10 cup warning light will light up.
If, on the other hand, five or fewer cups of cof-
fee are desired, the switch should not be
pressed. In this way, the hot water will flow
more slowly through the ground coffee and a
more flavorful beverage will be obtained.
• The brewed coffee will begin to drip out after
a few seconds.
It is completely normal that
during the percolation of the coffee, some
steam may escape from the machine.
• If the DRIP/AUTO button (fig. 9) is left
pressed after percolation, and the container is
standing on the heating plate, the coffee will
be kept at the ideal temperature.
HOW TO SELECT THE AROMA OF THE FILTER
COFFEE
With the ACCUFLAVOR , it is possible to select the
aroma of the filter coffee depending on personal
taste. By turning the aroma regulation knob of the
coffee filter (fig. 11), the coffee machine can be
programmed for a strong aftertaste (STRONG
position) or a lighter flavor (LIGHT position).
The ACCUFLAVOR feature changes the aftertaste
of the coffee, more or less strong, while the true
taste of the coffee remains unchanged.
HOW TO PREPARE ESPRESSO COFFEE
1. Unscrew the plug of the hot water heater tank
by turning it in a counter-clockwise direction.
2. Fill the small container for espresso coffee with
the quantity of water indicated in the table at
the end of the text and in accordance with the
number of cups of espresso that you wish to
make (fig. 12).
3. Pour the water into the hot water heater tank
(fig. 13).
10 5