


continue to drip out of the tube.
• Brew the coffee into the small espresso coffee
pot. When the darker colored coffee (which
lies under the lighter coffee colored froth)
reaches the level 2 on the “COFFEE LEVEL” side
of the small espresso pot (fig. 26), place the
Vario System selector to the “cappuccino”
mode (fig. 19). Careful attention must be paid
to this operation: in fact, if the coffee should
surpass the level 2, there will be no water left in
the tank to make the steam for frothing the milk.
• Pour the coffee into 2 sufficiently large cups.
• Place the cup containing the coffee under the
tube of the milk tank, making sure that the milk
tank has been attached firmly, then turn the
steam release knob in a counter-clockwise
direction. The frothed milk will begin to exit
from the tube of the milk tank (fig. 23). Before
beginning this operation, always wait for the
“OK” light (fig. 27) to turn on which indicates
that the ideal temperature has been reached
for frothing the milk. To keep the milk from
spraying it is necessary to slide on the anti-
spray nozzle (fig. 28) onto the tube of the milk
tank. This is also useful when the cups used for
the cappuccino are quite small.
• Fill the cup with the desired quantity of frothed
milk.
To ensure that the milk froths correctly,
always wait for the “OK” warning light to
turn on before frothing milk between one
cappuccino and the other.
• ATTENTION: Once the frothing of milk for the
last cappuccino has finished, before closing
the steam handle always wait until all the
steam has come out from the milk tank tube;
in this way you avoid the milk going sour in
the internal tubes of the frother.
• Press the ON/OFF switch for espresso/cap-
puccino to turn off the appliance.
• In order to make 4 cappuccinos, it is necessary
to repeat the previous operations, paying
attention to the quantity of ground coffee and
water, indicated in the chart at the end of the
text. Furthermore, before positioning the Vario
System selector to the Cappuccino position,
brew enough coffee into the coffee pot to reach
the level 4 on the “COFFEE LEVEL” side as indi-
cated in figure 29.
• To make the perfect cappuccino, we recom-
mend the use of the following proportions:
1/3 coffee, 1/3 plain hot milk, and 1/3
frothed milk.
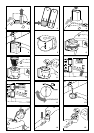
CLEANING AND MAINTENANCE
• Before beginning any cleaning or maintenance
operation, turn the machine off, remove the
plug from the electrical power source and let
the machine cool down.
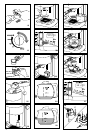
CLEANING THE MILK FROTHER
The cleaning operations for the milk frother must
be done after each use. Proceed as follows:
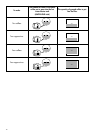
• Remove the milk tank by pressing the ‘C’ lever
(fig. 30) and simultaneously pulling upwards;
wash it with warm water.
• Remove the red milk frothing instrument by
pressing down on lever (A) and at the same
time, pulling upwards (fig. 30). Remove the
rubber mixer, rinse it and clean it thoroughly
with hot water, with special attention paid to
the holes illustrated in figure 31 (clean them
with the use of a needle).
Make sure that the hole marked with the arrow
B (fig. 31) has not been clogged (clean it with
the use of a needle).
• Once clean, all of the pieces must be reassem-
bled in the correct order. In particular, make
sure that the rubber mixer has been inserted
properly all the way down and that the milk
tank and the red milk frother have been insert-
ed all the way until a click is heard.
If this cleaning need is not done after every use,
the milk frothing operation may not come out
well or it may happen that either the milk is not
drawn up properly or that the milk drips from the
milk tank tube.
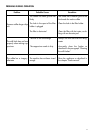
OTHER CLEANING PROCEDURES
• To clean the machine, do not use solvents or
abrasive detergents. A soft damp cloth should
be used to clean the surfaces.
• Regularly clean the filter holder, the drip col-
lection pan, the hot water drip spout, and the
coffee pots. Do not wash the filter holder in the
dish washer.
9