


10
the performance of your appliance, we re-
commend installing a water softener filter as
described in the section “WATER SOFTENER
FILTER”. If your model is not provided with
a filter, you can request one from De’Longhi
Customer Services.
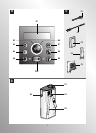
TURNING THE APPLIANCE ON
Please note!
Before turning the appliance on, make sure the
main switch on the back of the appliance is in the
I position (fig. 1).
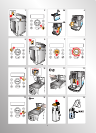
Each time the appliance is turned on, it performs
an automatic preheat and rinse cycle which can-
not be interrupted. The appliance is ready for
use only after completion of this cycle.
Danger of burns!
During rinsing, a little hot water comes out of the
coffee spouts and is collected in the drip tray un-
derneath. Avoid contact with splashes of water.
button (fig. 5). The message “Heating
up... Please wait” is displayed.
After heating, the message “Rinsing...” is displa-
yed. As well as heating the boiler, the appliance
also heats the internal circuits by circulating hot
water.
The appliance is at temperature when a message
indicating the coffee taste and quantity is displa-
yed.
TURNING THE APPLIANCE OFF
Each time the appliance is turned off, it performs
an automatic rinse cycle which cannot be inter-
rupted.
Danger of burns!
During rinsing, a little hot water flows from the
coffee spouts.
Avoid contact with splashes of water.
To turn the appliance off, press the button
(fig. 5). The appliance performs a rinse cycle,
then the message “Turning Off Please wait...” is
displayed and the appliance goes off.
Please note!
If the appliance is not used for an extended pe-
riod, also place the main switch in the 0 position
(fig. 6).
Important!
To avoid damaging the appliance, never place the
main switch (fig. 6) in the 0 position while the
appliance is on.
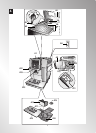
MENU SETTINGS
When you access the programming menu by pressing
the P button, the following menu items are available:
Descale
For instructions on descaling, see page 18.
Adjust time
To adjust the time on the display, proceed as fol-
lows:
1. Press the P button to enter the menu;
2. Turn the selection knob (fig. 8) until “Adjust
time” is displayed;
3. Press the button (fig. 2);
4. Turn the selection knob (fig. 8) to change the
hours;
5. Press the button to confirm;
6. Turn the selection knob (fig. 8) to change the
minutes;
7. Press the button to confirm.
This sets the time. Press the button to exit
the menu.
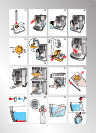
Auto-off
The appliance is set to turn off automatically if
not used for 2 hours.
The time can be changed so that the appliance
switches off after 15 or 30 minutes, or after 1,
2 or 3 hours.
To re-programme Auto-off, proceed as follows:
1. Press the P button to enter the menu;
2. Turn the selection knob (fig. 8) until “Auto-
off” is displayed;
3. Press the button;
4. Turn the selection knob (fig. 8) until the de-
sired operation time is displayed (15 or 30
minutes, or 1, 2 or 3 hours);
5. Press the button to confirm;
6. Press the button to exit the menu.
Auto-off is programmed.