


16
CLEANING
Important!
• Do notuse solvents, abrasive detergentsor alcohol to
clean the coee maker.
With De’Longhi bean to cup coee makers, you need not
use chemical products to clean the machine.
• None of the components can be washed in a dishwasher
apart from the milk container (C).
• Do not use metal objects to remove encrustations or coee
deposits as they could scratch metal or plastic surfaces.
Cleaning the coee grounds container
When “EMPTY GROUNDS CONTAINER” is displayed, the grounds
container must be emptied and cleaned.
Until the grounds container has been cleaned, the appliance
continues to display the message and coee cannot be made.
Important! Danger of burns
If you make a number of cappuccinos one after the other, the
metal cup tray becomes hot.
Wait for it to cool down before touching it and handle it from
the front only.
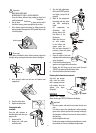
To clean (with the machine on):
• Removethedriptray(g.26),emptyandclean.
• Empty the grounds container and clean thoroughly to
remove all residues left on the bottom. This can be done
with the spatula on the brush provided.
• Check the condensate tray (red) and empty if necessary.
Important!
When removing the drip tray, the grounds container must be
emptied, even if it contains few grounds.
If this is not done, when you make the next coees, the
grounds container may ll up more than expected and clog the
machine.
Cleaning the drip tray and condensate tray
Important!
The drip tray is tted with a level indicator (red) showing the
level of water it contains (g. 27).
Before the indicator protrudes from the cup tray, the drip
tray must be emptied and cleaned, otherwise the water may
overow the edge and damage the appliance, the surface it
rests on or the surrounding area.
To remove the drip tray:
1. Remove the drip tray and the grounds container (g. 26);
2. Empty the drip tray and grounds container and wash
them;
3. Check the red condensate tray and empty if necessary.
4. Replace the drip tray and grounds container.
Cleaning the inside of the coee maker
Danger of electric shock!
Before cleaning internal parts, the machine must be turned
o (see “Turning o”) and unplugged from the mains power
supply.
Never immerse the coee maker in water.
1. Check regularly (about once a month) that the inside of
the appliance (accessible after removing the drip tray) is
not dirty. If necessary, remove coee deposits with the
brush provided or a sponge.
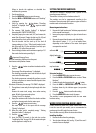
2. Remove the residues with a vacuum cleaner (g. 28).
Cleaning the water tank
1.
Clean the water tank (A17) regularly (about once a month
and whenever you replace the water softener lter (if
provided) with a damp cloth and a little mild washing up
liquid.
2. Remove the lter (if present) and rinse with running water.
3. Replace the lter (if provided), ll the tank with fresh water
and replace the tank.
Cleaning the coee spouts
1. Regularly clean the coee spouts with a sponge or cloth
(g. 29A).
2. Check the holes in the coee spout are not blocked.
If necessary, remove coee deposits with a toothpick (g.
29B).
Cleaning the pre-ground coee funnel
Check regularly (about once a month ) that the pre-ground
coee funnel (A6) is not blocked.
If necessary, remove coee deposits with the brush (D2)
supplied.
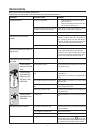
Cleaning the infuser
The infuser (A9) must be cleaned at least once a month.
Important!
The infuser may not be extracted when the machine is on.
1. Make sure the machine is correctly turned o (see “Turning
the appliance o” on page 9).
2. Remove the water tank.
3. Open the infuser door (g. 30) on the right side.
4. Press the two red release buttons inwards and at the same
time pull the infuser outwards (g. 31).
5. Soak the infuser in water for about 5 minutes, then rinse
under the tap.